
Here's my step by step on how I made our kitchen recycling bins cabinet. I designed it to hold 3 x 25L Wham bins with a hinged lid opening and liner storage etc underneath with a drop down drawer cover. You can find an easy follow-along video at the bottom! for more guidance!
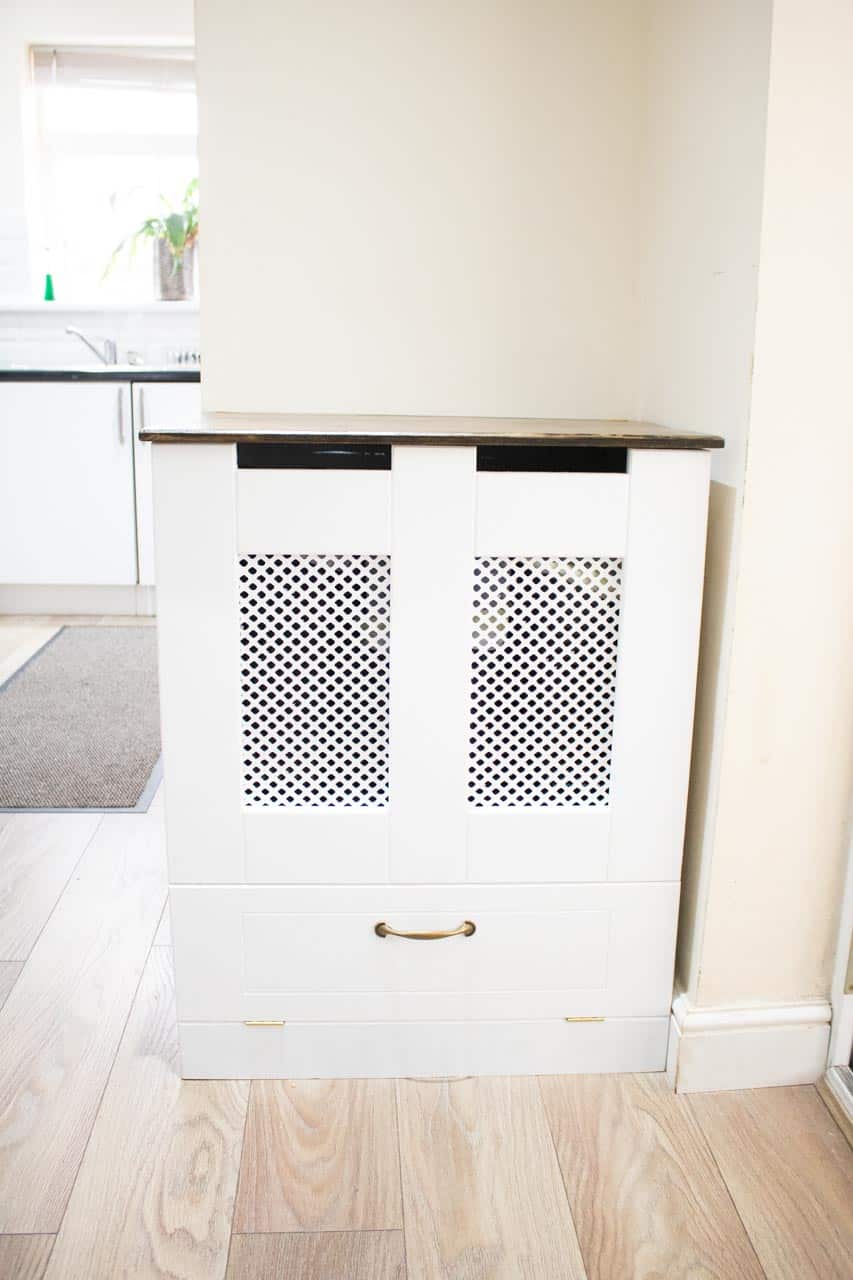
I've been really inspired to try cabinet making lately after successfully learning how to make my easy radiator covers a few weeks back.
We've probably been like many other families where we just didn't have a tidy recycling set up. We'd use any box we could find, or even bring in the cardboard box that comes inside the council wheelie bin.
And because we'd store them anywhere in our conservatory, the room would always look messy no matter what. So I wanted to design a stylish cabinet to disguise them. But also sit in this void space just outside our kitchen archway. And instantly it's felt more encouraging and everything's tidy again.


HOW MY 3 COMPARTMENT KITCHEN RECYCLING BINS WORKS
My kitchen recycling bins cupboard is designed around 3 x 25L Wham bins with flip lids. (Affiliate link). I separate mine in to: general waste, cardboard or paper and mixed, such as plastic, glass and tin.
Note, we don't recycle food waste as our council now charges £40 extra per year. These recycling bins are almost big enough for a week's recycling before we have to start empty them in to the outside wheelie bins. But as they're quite short, I built it where the bins are raised with a hinge lid. The plan is to less likely to get back aches.
This also meant I could create simple shelf underneath with a drop down drawer cover to store the things we less frequently reach for. So it's been ideal for bin liners and a dustpan and brush.


WOOD I USED FOR MY KITCHEN RECYCLING BINS CUPBOARD
I'm especially proud that apart from new hinges and a handle, I made the entire structure of my recycling bins using old 18mm thick off cuts. There were random things such as: hardwood plywood, melamine MDF and a 15mm pine top.
I felt recycling old bits of kitchen doors (the MDF) and anything thick enough to keep its integrity was a great excuse for a recycling station. And kept down clutter in our garage.
Thankfully, because I also used leftover patterened MDF screen, it ties in nicely with radiator covers in the same room! But, despite using contrasting wood finishes, it all matched after two coats of satinwood. Who's to know?

WHY KITCHEN RECYCLING BINS ARE SO IMPORTANT
Having my kitchen recycling bins set up has been much easier to do our bit for the environment. By being able to sort through our rubbish, we can:
- Help reduce harmful chemicals and greenhouse gasses emanating from landfill sites
- Slow down progressively filling landfill sites
- Cut down the need for raw materials used, making production more sustainable
- Preserve rainforests and energy as opposed to producing with raw materials
- It's also said that it's cheaper to produce by recycling waste
- Preserves future natural resources

THINGS TO CONSIDER WITH A HINGED LID AGAINST A WALL
Now, if you watch my video at the very bottom of this page, you'll notice I had to make some adjustments with my hinged lid. That's because, as I wanted my kitchen recycling bins flat against the wall. (Also known as plumb to the wall).
So the only way I could do it is to have a separate pine top strip fixed to the top at the back as above. But you'll also need to design the unit deep enough to allow removing the recycling bins with ease. And cut a section out at the bottom back to fit around the skirting board. AKA scribing.
You can't just fix some hinges at the back of a lid, then mount to the unit as the lid needs allowance to open freely. HOWEVER, if your recycling bins centre won't be sat against a wall, then yes, you can. Just bear in mind you need more material. You'll also notice that because of my error, I needed to add a back as opposed to my initial lightweight, but sturdy strip.

FREE PRINTABLE PLANS ON HOW TO MAKE MY KITCHEN RECYCLING BINS
These plans are here for guide purposes only and you should always check measurements as you go in case of discrepancies of measurements and bin sizes. Also, please ensure you read the paragraph above as these plans are how I would make my kitchen recycling bins cupboard if I had to start again.
The plans do not include a back as shown in my pictures, which isn't necessary, providing you make you unit deep enough in the first place. I hadn't anticipated my hinge lid top not working, so had to adjust.
Above, I'm cutting out my workaround so you can get it right straight from the start, including measurements for the 25L recycling bins. But, with a bit of planning, you can adjust to build around different sized bins.
THINGS I USED TO MAKE MY KITCHEN RECYCLING BINS
- 3 x 25L Wham kitchen recycling bin
- 18mm plywood or similar Pine top (old B&Q value shelf)
- MDF screen
- Tape measure
- Erbauer cordless circular saw (gifted)
- Erbauer battery
- Safety boots (gifted)
- Irwin clamps
- Spirit level as straight edge
- Face mask
- Ear defenders
- Goggles
- Combination square
- Speed square
- Erbauer palm router (gifted)
- Chamfer router bit (45 degree) from this set
- V router bit from this set
- Erbauer biscuit jointer
- No. 20 biscuits
- Titebond 2 wood glue
- 2 x 1200mm sash clamps
- Combi drill
- Fatmax combi drill
- Wood drill bits
- Wood screws
- Erbauer cordless jigsaw (gifted)
- Brass handle
- Brass butt hinges
- Modesty/ Cabinet blocks
- Chisels
- Makita belt sander
- Shims
- Dulux Trade Satinwood paint in white
- Old wood stain by Duratec in Ebony
- Varnish in clear satinwood
- Cabinet magnetic catches
- Side welded 3mm chain
- Eyelet screws
- Pliers and snipe nosed pliers
- Hacksaw
HOW TO MAKE A KITCHEN RECYCLING BINS CUPBOARD

Once you know what size you need your kitchen recycling bins cabinet to be, work on cutting the front panels with a circular saw. It's best to have accuracy for this, so avoid using a hand saw.
However, it may be worth taking a cut list to a DIY store that include this service when purchasing wood.
Then lay them out for a visual to see if you're happy with them before continuing.

MARKING FOR OPTIONAL HAND SLOTS TO LIFT THE HINGED LID
If you don't like the look of the vent handles, then you can skip to the next step. I designed mine this way to match the my radiator covers while serving an extra purpose.
To create hand slots, I removed the horizontal strips and temporarily butted the vertical panels evenly together. Then, using a combination square, marked 30mm along the top which will be the start position of my horizontal strips.

TIDYING UP THE EDGES OF THE FRONT CUT SECTIONS
Place a 45 degree chamfer router bit (which has a bearing at the bottom) in your router. Set it to your desired depth. Note, I ALWAYS test my router bit on off cuts before I go for gold.
Then router all of the section's edges, usually except the top. However, I may have got carried away, but hey ho. (It's best to label which side you want and don't want to router).

JOINING ALL THE STRIPS TOGETHER
First, mark dead centre of the panels where each strip joins another. *Make sure you transfer the same mark to the joining strip.
Then clamp the panels to a flat surface and cut with a biscuit jointer set at number 20. Note, number 20 biscuits is suitable for 18mm+ thick wood.
Now glue and fill the slots with number 20 biscuits and sash clamp everything together and leave overnight where possible. To ensure your front is square, check the measurements are the same from corner to corner, diagonally.

Once set, mark for biscuit slots at the rear of each left and right side of your front section. And line these up with the side panels, then cut your slots.
IMPORTANT! I highly recommend you test again on scrap wood to ensure your depth is set up correctly. If not, you may need to adjust before cutting.

CUTTING AND BISCUITING FOR A SHELF
After cutting your shelf, biscuit cut the front of the shelf and the back bottom of the front section where they'll join. This is to raise your recycling bins to approximately waist height.
Then using clamps to temporarily prop up the shelf. And glue, biscuit and fix modesty blocks above for extra support. But remember, my unit is upside down at present.

DETERMINING THE DRAWER'S HIDDEN SHELF POSITION
After cutting your drawer cover's depth, hold it against the front to find out where to position your hidden shelf. The shelf should sit just underneath where the starts because the edge will be hidden with trim.
Then clamp and fix with modesty blocks again. Note, if you have a pocket hole jig (which I don't), then you fix with screws instead. However, this is a much cheaper method and doesn't matter when they won't be visible anyway.

ROUTERING INTERESTING DETAIL TO THE DRAWER COVER
Once you've cut the drawer cover to the correct height (and width to match the rest of your recycling bins unit), then you can now router detail. If it doesn't match your unit yet, then your router details won't match.
Now clamps straight edges to the ends of your drawer cover with the clamps facing down so they don't get in your way. This is now your router fence to keep you on track, then run around the inside of it. In my case, I used a v-bit for sharp flute lines.
Note, you can create whatever pattern you want. I just opted for this method as it is easy and stylish. And remember, wherever your clamp your wood, you can change where you want your flutes. I also tested on off cuts first.

ROUTERING HINGES IF USING BUTT HINGES
Firstly, if you want to make life so much easier for yourself, then try looking for front face hinges to avoid chiselling the depth of your hinges. Sadly hinge selections in UK mainstream DIY stores is pretty poor, so I bought these instead.
And it can be tricky. Chisel too much or use with wrong screws and they may not close properly. If you don't chisel the depth out they're not as strong and you'll be left with an unprofessional gap. So after trying chisels as I did the doors in our house, it quickly became apparent that routering with an imperial straight bit was much quicker.
But routering out for hinges is SO MUCH FUN! If you try this method, test your depths on off cuts, but make sure (as with every power tool here), to wear safety gear. It's loud and gets dusty.

ATTACHING THE SCREWS
I've since read in many forums it's best to add screws with a non-electric screw driver. I think I just got lucky as mine didn't rip out.

TRIMMIING DOWN THE TRIM
Once the trim and drawer lid are fixed together with hinges, then position where it'll go on your unit. Then mark either side where the overhang is along the bottom.
And using a straight edge (I used a long spirit level), I joined these marks up. This will be your cut line.
Then I carefully cut out with a jigsaw as straight as possible as this would be visible along the floor. Now glue behind the trim (either on the trim or the unit) and fix with modesty blocks.


HOW TO POSITION YOUR HANDLE
Attaching handles is tricky without a template as your need to screw from behind. So here's how I made a jig from off cut wood, but you could use cardboard.
Using an off cut, I drilled a 5mm hole for one of the handle's screw and fixed in to place. The I drew around the other section and with a bit of trial and error, drilled a 2nd hole for the 2nd screw. Once I'd got it right (on my 2nd attempt), I drew a centre line and straight line between and on the outside of the screw holes as above.
Then drew a straight line of where I wanted my handle and found the centre line on that too. Then lined up my jig with the marks on the cabinet and drilled my screw holes.

ATTACHING MAGNETIC FIXERS FOR THE DRAWER COVER
I ended up finding one magnetic fixer was enough and in the centre. To find the depth of where to fix the block, leave both pieces together. Then hold against the back of the back of wood to find your position.
Then drill and screw the main block. Followed by the strip you can see above.

ATTACHING BACK STRIP THAT HOLDS THE LID
Unlike my final end shots (for which I had to make a correction for), I'm sharing with you the method I started with and would still ideally have used. I had to eventually remove this section to add a back as my sides weren't deep enough to accommodate my modified top hinge lid.
As long as you make your side panels deep enough, I'll continue to share this build with my preferred design to save you hassle.
This section is cut and sandwiched between both side panels and mounted with more cabinet blocks. It's sturdy enough for a lightweight pine top.

ROUTERING THE LID
After biscuiting and joining two off cuts of pine, I chamfered all of the edges.
I then cut another strip of pine to position at the back above that section (two photos above) and routered for more butt hinges. Again, front facing hinges would be easier.

Then line up and screwed the lid to the back section of the recycling bins. However, if your wall is completely out like mine, then please refer to the video below for scribing.

ADDING CHAIN TO THE DRAWER COVER *PREFERABLY AFTER PAINITNG
Open the drawer to a horizontal postion, then measure and cut were you want the chain. For ease, it's best to clamp tight both sides of the chain so it stays fairly still while cutting with a hack saw.
Then remove the cut bit with pliers. Now pre drill holes where you want the eyelets to go and plier open one of them to attach a side of the chain and close up, then screw in by hand.
Then pre drill your next eyelet position, plier open, screw in to the hole. Now add the chain and carefully close with pliers.

STAINING THE TOP RECYCLING BINS LID
Below, I stained with two coats of old ebony wood stain my Dad gave me, but left to dry and sanded in between. For best control, it's best to thin the stain with water first if it's quite thick.
Then follow on with another coat of how un-thinned stain. Repeat until you get your desired colour and do the same with clear varnish of your choice.

PAINTING YOUR KITCHEN RECYCLING BINS CABINET
It's best to gently sand your wood for better adhesion. And some would suggest sealing with undercoat if using MDF.
However, I painted two coats with self undercoating Dulux Trade satinwood in in brilliant white. It's messy oil based stuff that dried overnight, but the professional finish is worth the wait.
To apply, I always use a mini foam roller to a void brush strokes. And ensure you catch drips before you leave it to dry.

PIN MY KITCHEN RECYCLING BINS CABINET FOR LATER...


Kitchen Recycling Bins Cupboard DIY
Equipment
- Tape measure
- Erbauer cordless circular saw (gifted)
- Erbauer battery
- Safety boots (gifted)
- Irwin clamps
- Spirit level as straight edge
- Face mask
- Ear defenders
- Goggles
- Combination square
- Speed square
- Erbauer palm router (gifted)
- Chamfer router bit (45 degree) from this set
- V router bit from this set
- Erbauer biscuit jointer
- 2 x 1200mm sash clamps
- Combi drill
- Fatmax combi drill
- Wood drill bits
- Erbauer cordless jigsaw (gifted)
- Chisels or Imperial straight router bit for hinge
- Makita belt sander
- Shims
- Pliers and snipe nosed pliers
- Hacksaw
Ingredients
- 3 25L Wham kitchen recycling bins
- 18mm thick plywood or similar
- 15mm + pine top *I used an old B&Q value shelf
- MDF screen *typically used for radiator covers
- No. 20 biscuits
- Titebond 2 wood glue
- Wood screws
- Brass handle
- Brass butt or front facing hinges *front facing hinges are easier and perfect for beginners
- Modesty/ Cabinet blocks
- Dulux Trade Satinwood paint in white
- Old wood stain by Duratec in Ebony
- Varnish in clear satinwood *I used Screwfix's floor varnish
- Cabinet magnetic catches
- Side welded 3mm chain
- Eyelet screws
Instructions
- Cut the front panels with a circular saw.
- Mark 30mm line along the top of the verticals if create hand slot/vents to open lid late.
- Chamfer all the front section cuts with a 45 degree chamfer router bit.
- Mark central of each strip where it joins opposing panel and transfer to other side. Do this on all areas where the strips meet.
- Cut biscuit slots for number 20 biscuits. Note number 20 is for 18mm or thicker wood.
- Glue and biscuit all slots and clamp together. Ensure all is square by checking measurements are equally with a tape measure. This is measured from corner to corner. Once it is, leave to dry overnight.
- Mark and biscuit slot at the back of the left and right side of the front panel and on to the side panels. You may need to adjust the biscuit slot depth for accuracy when joining together. Glue and clamp as before. If not enough clamps, do it in sections.
- Cut a shelf to raise the recycling bins and biscuit cut, glue, biscuit and clamp. While left to e, fix cabinet/modesty blocks from underneath the shelf for extra support.
- Hold the drawer cover in place and screw the next shelf just below it (which will be covered up by the final trim).
- Now add detail on the drawer cover as shown in the notes above.
- Then line up the trim and mark where your hinges will go. If using butt hinges (harder than front facing hinges), router out the hinge depth with an imperial straight bit. Please watch the video embedded to see how.
- Screw the hinge in place - preferably with a non-electric screw driver. Then position the drawer with thin shims to ensure easy opening. And mark where the trim overlaps before cutting carefully with a jigsaw.
- Glue and mount the bottom trim on with more modesty blocks (or pocket hole jig if you have one).
- Screw on the cabinet magnet. (See video again).
- Cut the chain with a hack saw and using pliers, open the eyelets and drill a narrower hole at the back of the drawer cover and inside the drawer section where you'll hand screw it in.
- Now using my handle jig from an offcut (in notes above), drill where you want your handle and screw to drawer cover.
- Attach back strip for hinge top with modesty blocks.
- Cut out pine top and biscuit join, glue and clamp to create a larger piece if needed. Then router all around with a chamfer bit.
- Sand with an orbit sander if needed (I did this off camera), then cut a separate pine strip that will mount on top of the back strip and add hinges to create a top opening lid.
- Line up and mount the lid to the back strip.
- Then stain all top with your desired colour and varnish.
- Paint your piece with your desired paint. I used self undercoating Dulux Trade satinwood in brilliant white which is oil based.

[…] Diy Kitchen Recycling Bins Cupboard (via The Carpenter’s Daughter) […]