
Whether you have an old cable reel, cable drum, wire spool... call it what you will, I'm going to show you how to make this AMAZING cable reel table that's PERFECT for family gatherings and social events. It would even look great in a pub garden!
Includes an easy step by step how-to video!
AD | This project includes a paid promotion by eBay UK where you can shop all things Home & Garden.
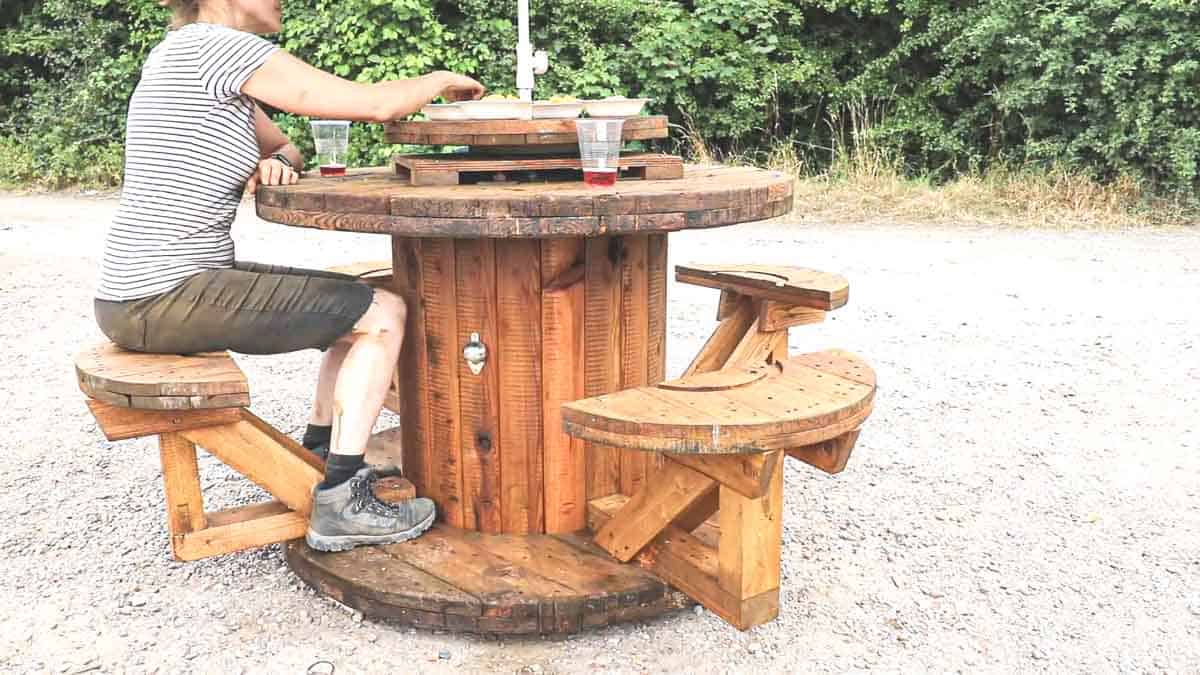
Garden furniture doesn't need to cost the earth. It doesn't need to be difficult to make, either.
So here I'm going to show you how to turn a cable reel into an AWESOME garden table and picnic bench combo.
This cable drum bench also has some cool features your family and friends will love to make sure they're fed, watered, and entertained with a lazy Susan furniture twist!

Wood Spool Table Tools & Materials I Used
This project includes a paid promotion by eBay UK where you can shop all things Home & Garden.
- 1 large cable reel main table
- 2 small cable reels for 4 seats - not plywood ones!
- Fence posts or similar for seat supports
- Tape measure
- Impact driver
- Sander
- Tenon saw with mitre box
- Hand saw
- Wood glue
- Wood preserve
- Used parasol
- Fabric spray paint for parasol
- Wall-mounted beer bottle openers
- Lazy Susan mechanism

How to Take Apart a Cable Reel
The first job I worked on was dismantling 2 small electrical spools. There are metal rods inside and these are often spot welded on the nuts.
The easiest way I found to take them apart was;
- Create make-shift chocks to prevent them from rocking
- Hand saw into the slats closest to one end and remove one by one
- Hack saw (or angle grind) the metal rods
- Pry off the locator blocks underneath
Making Picnic Bench Seats
Then hand saw the ends into half circles, excluding the circle bit. We won't be using it for this cable drum table.

Lazy Susan Important Note!
DON'T cut ALL of the ends up. We'll need 1 left whole for the lazy Susan and the spare end makes a perfect 5-minute BONUS project that I'll show you later!
Cutting Tips
The ends are sandwiched together with LOTS of nails. They're very hard to avoid and can blunt saws and blades. You can either cut around them or try to use an old saw or blade in a circular saw.

Adding Spool Table Feet
Because gardens can be uneven, I hand sawed 4 blocked feet and drilled and screwed them to the bottom of my cable reel.
It's better to do this now while the reel is on its side because. Then lay it flat.
Avoid my Mistake!
Notice in the pic above that I'm positioning them evenly around the base? Well, I recommend going off centre here to avoid clashing with bolts I used later for my seat cantilevers. *This later meant my seats' supports weren't even with the reel's slats.
It would be an easy fix if the table was light or you have a few people to lift and move it!

Making Seat Cantilevers
Right now you should have 4 half circles shown in the pic above, or more if you want to add more seats around your table.
It's important that most of the support is mounted to the bottom of the table reel. This won't work well if your cable reel's end is small.
Children's Picnic Bench Idea
Tip: if you want to make a child's version using one of the small cable reels, you could try cutting 1 end into quarters instead!

Mounting the Seat Supports to the Cable Reel
Important Tip: the brackets should be glued and screwed together for strength.
HOWEVER, if you want to move it at a later date, I recommend only screwing and bolting the bracket to the reel's end!
As I'm moving my cable reel to a new house later, I needed to be able to dismantle it later, so I'm not using wood glue to mount it.

Making Seat Brackets for Cable Reels
Above, I:
- hand sawed a 45 degree angle on the end of a support piece in a mitre box
- offered it to my right angle and sat the 45 degree cut flat on the reel bottom
- pushed it as far to the centre of the reel
- marked my next 45 degree cut to the height of the upright's angle
- hand sawed again
- drilled and screwed the support pieces to the L bracket

Adding Seat Supports
To take out any potential wobble in the half circle seat, I cut and screwed a further two supports.
These are screwed right through the bracket and 45 degree supports.
They also have a mitre, but really, just for decoration here.

Bolting the Brackets
Before adding the seats, I started drilling a series of holes in the bottom mounting piece.
I would later tie together with nuts and bolts, so it's easy to dismantle and transport (then put back together) if needed.
Note: if you never plan on moving this and making it in situ, this isn't really needed.

Adding the Half Circle Seats
The next step was to drill and screw the seat bum sections.
Make sure you also go straight through the post.
You may want to clamp it down while mounting incase it's warped anywhere.

Adding a Lazy Susan
There's a few different types of lazy Susan mechanisms you can buy.
Above, you can see (and from this part of my video) that I mounted the plate to a square piece if plywood and mounted it to one of the whole spool ends.
You may prefer a ballbearing one that just sits on and can be removed easily.

I then raised it up using blocks as feet to raise it above all the nuts and bolts.
If you wanted, you could drill holes out to allow for these. Or, ensure you're mounting the lazy Susan to a cable reel top that doesn't have nuts and bolts protruding*.
* Heavy duty ones tend to have nuts and bolts on both ends!

Preserving your Wire Spool Picnic Table
Now that the main part of the build is done, I started working on the finishing details. I first sanded everywhere with an orbital sander using low grit sandpaper to reduce the chance of splinters. OR, perhaps make it as a DIY rope reel around the edges and middle?
As this is a rustic garden table and chair set, I was happy with the existing print. You could spend hours sanding if you wished. It depends how smooth you want it (and how much time you have!)
Then treated it all with a coloured wood preserve. It's SO important to make sure it says preservative on the label, otherwise it's likely just a stain.

Restoring an Old Parasol Umbrella
Before I show you this part of my table upcycle, did you know table umbrellas are REALLY expensive?! I picked this old one up cheap.
It was faded with a beer logo all over it that I didn't like, but it still worked fine. Initially I tried spray painting with fabric paint, but it soon became evident I'd need a lot more cans that I bought.
Instead, I watered down some blackboard paint and brushed over as a stain. Then gave it a final neat coat, which worked a treat!

Adding Bottle Openers
For a final add-on, I screwed 3 wall mounted bottle openers on the sides that could be shared between my guests.
Although this would benefit from a bottle top catcher below.
But either way, I know think this is the BEST picnic table for a party for drinks and nibbles, BBQ with my family, or somewhere I can use as an outdoor desk in the Summer!

Cable Drum Coffee Table Idea
Another thing you can do with the spare small cable reel end is this super quick DIY cable reel coffee table for an industrial feel.
Once you've stained the final whole small spool end (or a large one), you can add some hairpin legs on the bottom.
Hairpin legs can often be found cheap and you may even get away with just using 3. Or, as a console table, add two legs to a half circle where it rests against a wall for further support.

More DIY Garden Projects
- Bench restoration
- DIY garden bar with serving hatch
- Easy decking with planters
- Raised railway sleeper beds
- Swing canopy replacement
- How to make a large bird table
- Easy DIY garden path
- How to lay a patio on sand
- DIY gravel driveway
- Easy stepping stones
- DIY garden room
EASY Cable Reel Table (DIY Picnic Bench)

Whether you have an old cable reel, cable drum, wire spool... call it what you will, I'm going to show you how to make this AMAZING cable reel table that's PERFECT for family gatherings and social events. It would even look great in a pub garden!
Includes an easy step by step how-to video and a BONUS cable reel table idea!
Materials
- 1 large cable reel main table
- 2 small cable reels for 4 seats - not plywood ones!
- Fence posts or similar for seat supports
- Wood glue
- Wood preserve
- Used parasol
- Fabric spray paint for parasol
- Wall-mounted beer bottle openers
- Lazy Susan mechanism
Tools
- Tape measure
- Impact driver
- Sander
- Tenon saw with mitre box
- Hand saw
Instructions
- Dismantle the two smaller cable reels using a hand saw and hack saw
- Cut two of the smaller ends into half circles, but not including the holes in the centre
- Make the l-shape brackets as shown in the blogpost and glue, drill and screw together
- Drill and bolt the brackets to the large cable reel
- Screw the half circle seats on top
- Add the lazy Susan turn table to the top using one whole smaller cable reel end
- Sand everywhere to reduce splinters
- Brush over everywhere with a coloured wood preserve
- Screw mounted bottle openers to the large cable
- Enjoy using!

Comments
No Comments