
A comprehensive guide to linocut printing for your own YouTube merch. I talk you through the basics of how to start, what type of lino and ink to use and setting up your own online merchandise shop.
*This post includes Amazon affiliate links for the products I used. These are at no extra cost to you, but may earn me a small commission for my free advice.
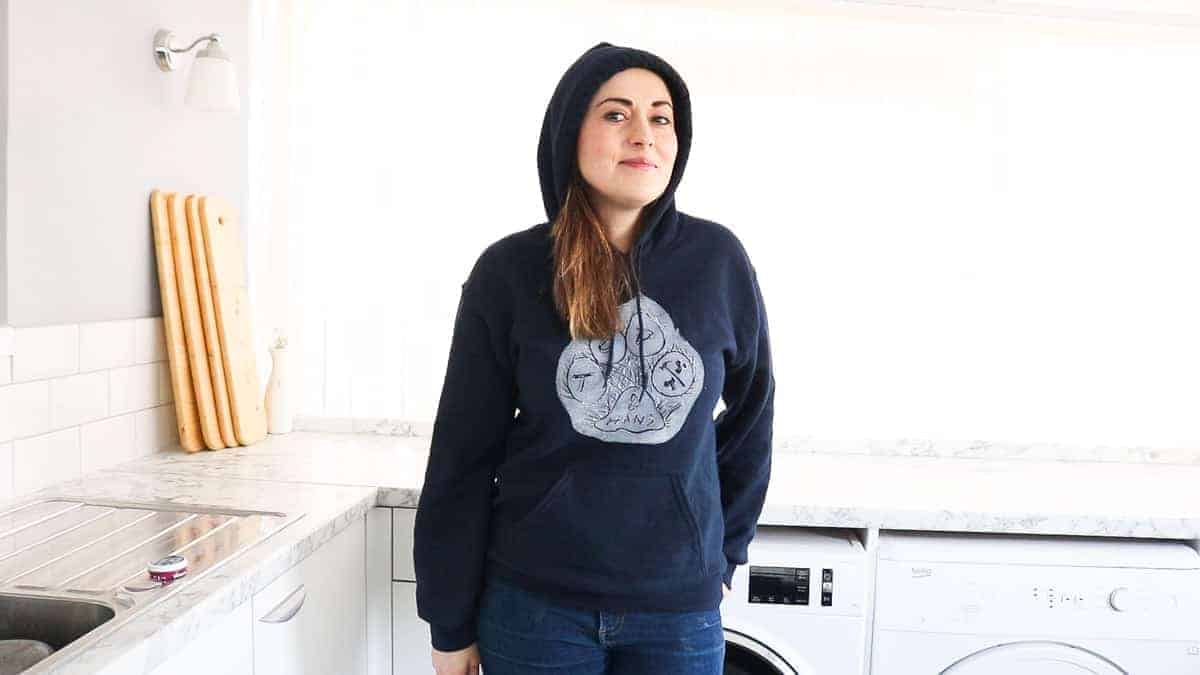
As a YouTube creator, I think it's important to think about additional streams of revenue in case YouTube disappeared. Or they made another change, like not targeting Ads to kids. It's common knowledge that the effort we YouTubers put into our videos doesn't always match the YouTube partnership scheme earnings. But obviously, it depends on your business model.
Some are amazing at making money from old rope. But my bag? Mine is to learn how to renovate my house, then relay what I've learnt to help others in the same boat. And that's because I empathise with DIY struggles.
If I don't understand something, I procrastinate, then I research something for hours or days until I'm confident. My ethos is to take the hassle away for others and share my DIY from my novice perspective. And linocut printing was exactly the same.

Linocut Printing Vs Screen Printing on a T-Shirt
Depending on how you want to produce your own YouTube merch, there are a few ways you can create printed t-shirts. Take screenprinting, for example. Screenprinting involves making a screen. This could be done using mesh attached to a frame and the following methods:
- Photo emulsion - requires a dark room and the right amount of lighting to expose and offer intricate detail.
- Drawing fluid and screen filler - painting your image which will be a stencil, but is likely to be a more basic print.
- Vinyl cutter - sticking a vinyl cut stencil to some mesh and taping it around the edges to avoid leaks. Again, this can be very basic, but great for writing.
All of the above can produce great work depending on your chosen design or artwork. However, if you're more traditional by favouring drawing on paper than a computer, then linocut printing may be for you. I also find linocutting very therapeutic, using linocut tools. You can also change your lino cutting design as you go, but remember, once cut, you can't add it back!
What's the Best Lino for Lino Printing?
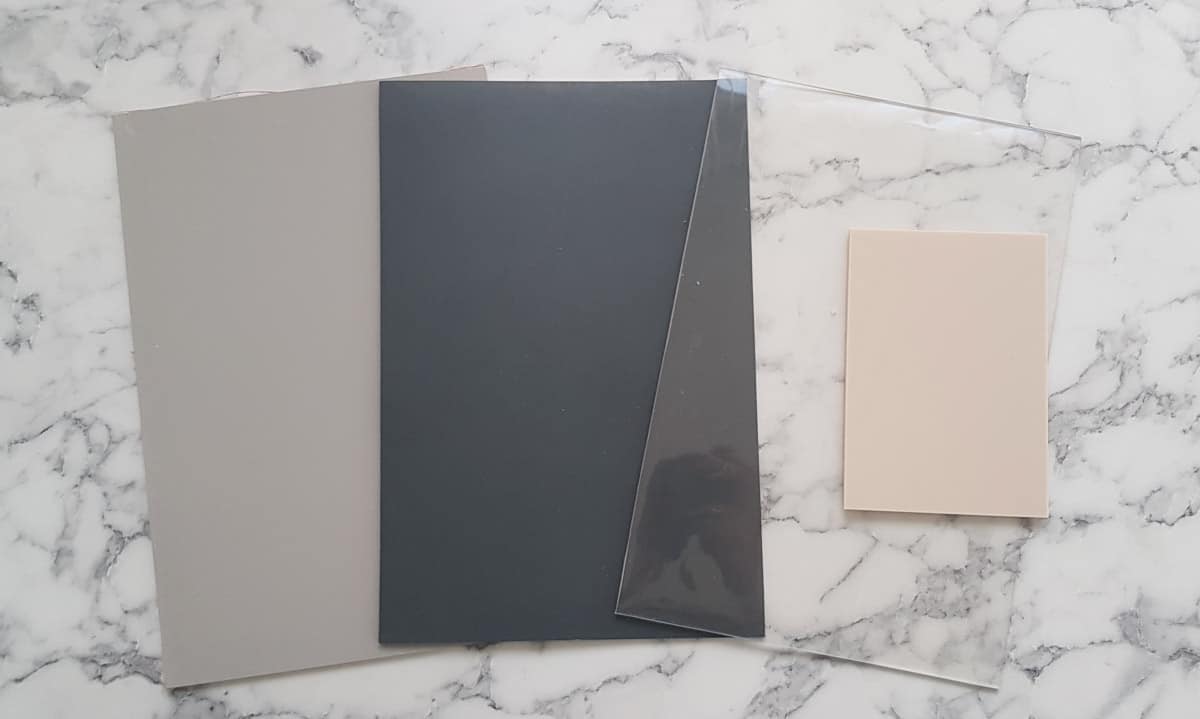
There are many types of lino available for block printing on fabric. And also, some are much more expensive than others for import reasons. But the most traditionally common one used is the Battleship Grey (far left). This is because you can create very intricate details for a more complex design.
It doesn't stretch, unlike others and with each carving, it snaps off, like a full stop to your carve. This is useful when you're lino cutting prints with minuscule detail. Yet for a complete novice, this can be daunting, particularly if not stored correctly when not using. The other types typically available are:
- Battleship grey as featured in my recent narrowboat linoprint and 2nd canal art print (as discussed above) - can require warming up, can snap which lends to easier finishes when carving and offers the most intricate detail. Better results are with a press to transfer design to paper or fabric. When washing, avoid wetting the hessian back as it can curl while drying.
- Softcut - like rubber, easy to carve and clean up and won't snap. Also doesn't require a press to transfer to lino print on fabric. But to finish cuts, you may need to stop sooner or backtrack.
- Easycarve - slimmer than above (can be seen in my Eiffel Tower lino print). It's easy to carve, but very dark to see where to carve. Similar as above, it doesn't snap off, so finishing around details needs more caution.
- Transparent sheets - stiff clear rubber and appears difficult to see where you've carved.
I personally favoured the softcut lino for my YouTube merch, but battleship grey is a dream to work with. I didn't need any special printmaking presses, making my set up fees minimal. Also, it's easy for a novice to carve, clean after done and won't break if mishandled.
What Lino Cutting Tools I Used for Carving
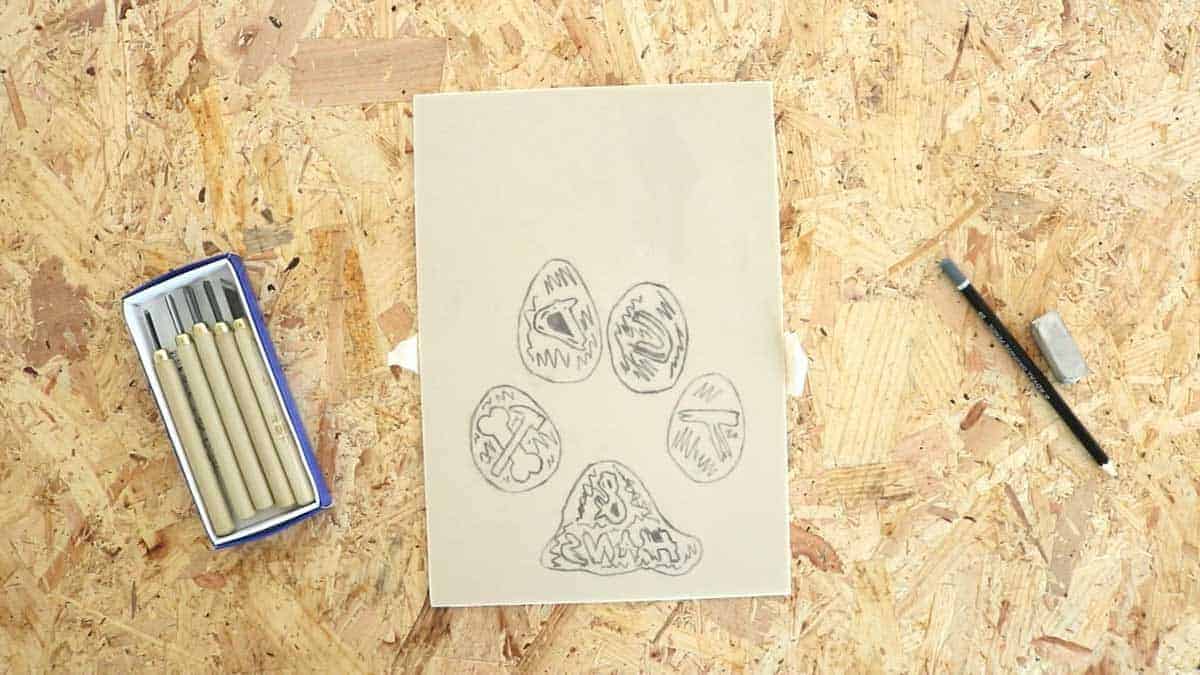
Lino cutting tools can be very expensive, the more you want to progress as a linocut artist. And one of the most popular set of tools I discovered were these Pfiel tools for block and linocutting. But that's a pretty heavy dent in your profits for anyone who may not even sell a linoprinted t-shirt!
And while I'm here, I don't think there's anything wrong with making and selling your own first designs. If your YouTube subscribers love you and your branding, then I'm sure they'd appreciate supporting you by buying something you've personally made. Especially unlike more commercial companies, such as Teespring or Spreadshirt.
However, if you're getting started, a set I highly recommend are these Japanese cutting tools for wood and lino. They're a fraction of the price and can be sharpened. Also, despite using a v-shaped winged one from my Essdee lino cutting and printmaking kit, I favoured not having to keep changing heads.
2022 Update: I now also use a DIY bench hook for Japanese wood carving and linocuts.
What Fabric Ink Should I Use?
Finding the best fabric ink really is down to personal preference. And it requires a lot of testing from ink to ink from applying to washing. But thankfully, we have the internet to help anyone who doesn't have time and money to waste.
When you're dealing with a low-cost setup, what will help is finding an ink with a quick curing time, ultimately reducing your lead time. In other words, your customers won't have to wait as long and could result in more sales. AND, you can make to order, rather than make t-shirts you might not sell, in advance.
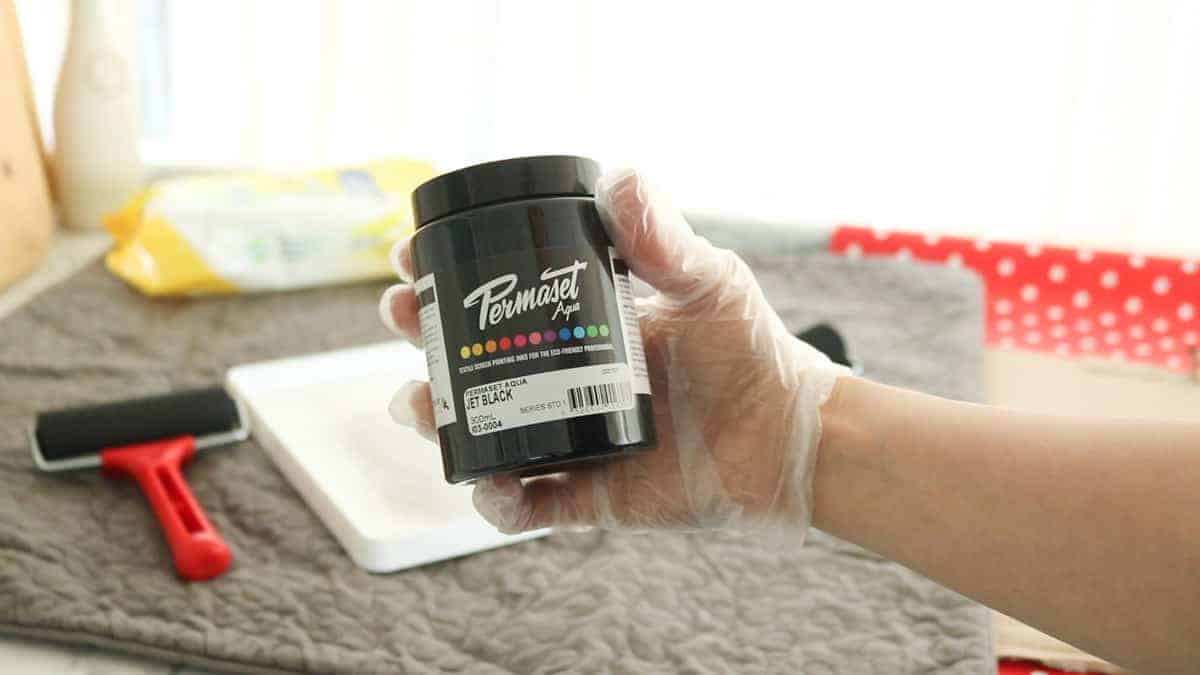
And that's why I decided to buy Permaset Aqua, which is actually a screenprinting ink. Many t-shirt screen printers use this as it can be heat cured on the same day. Whereas, Speedball fabric block printing ink cures when left for two weeks to dry naturally. With the latter, you may struggle with demand and no one likes to wait.
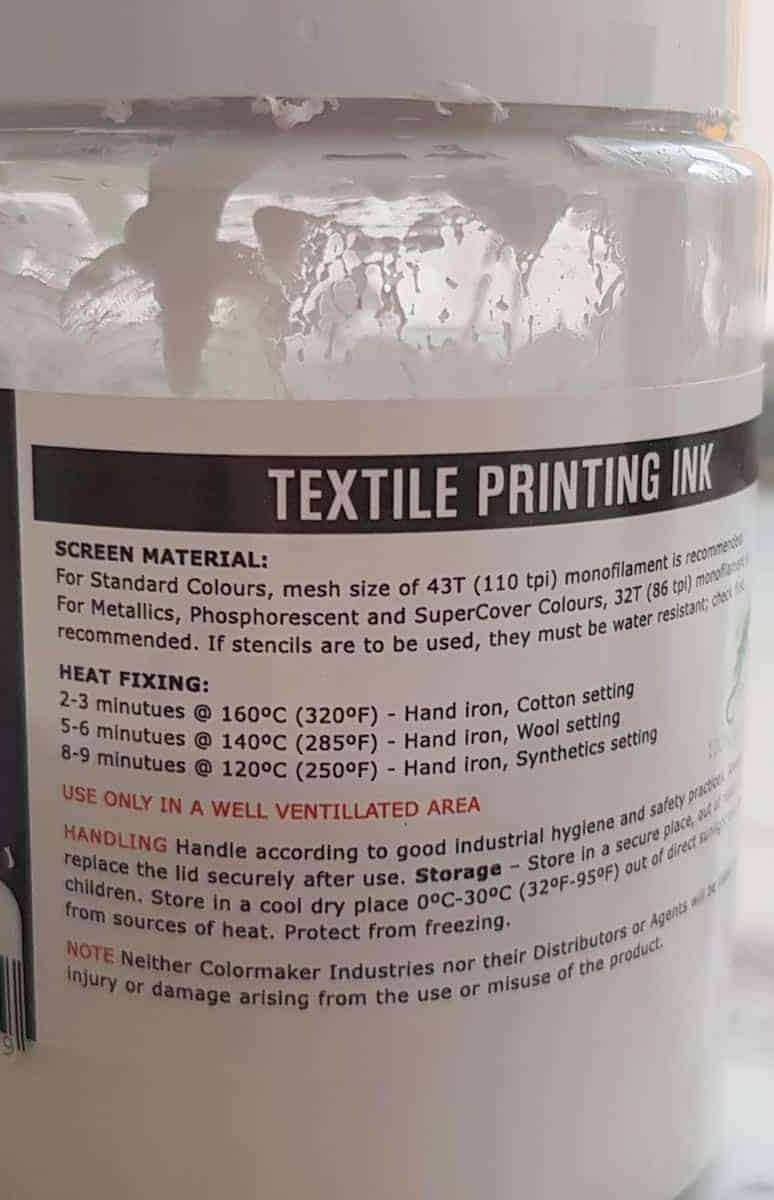
How to Cure Permaset Aqua Textile Printing Ink
Before I talk you through my whole process from start to finish, you'll need to know how to cure Permaset ink. And, for reference, it's the same process with their Supercover, designed to stand out on darker fabrics.
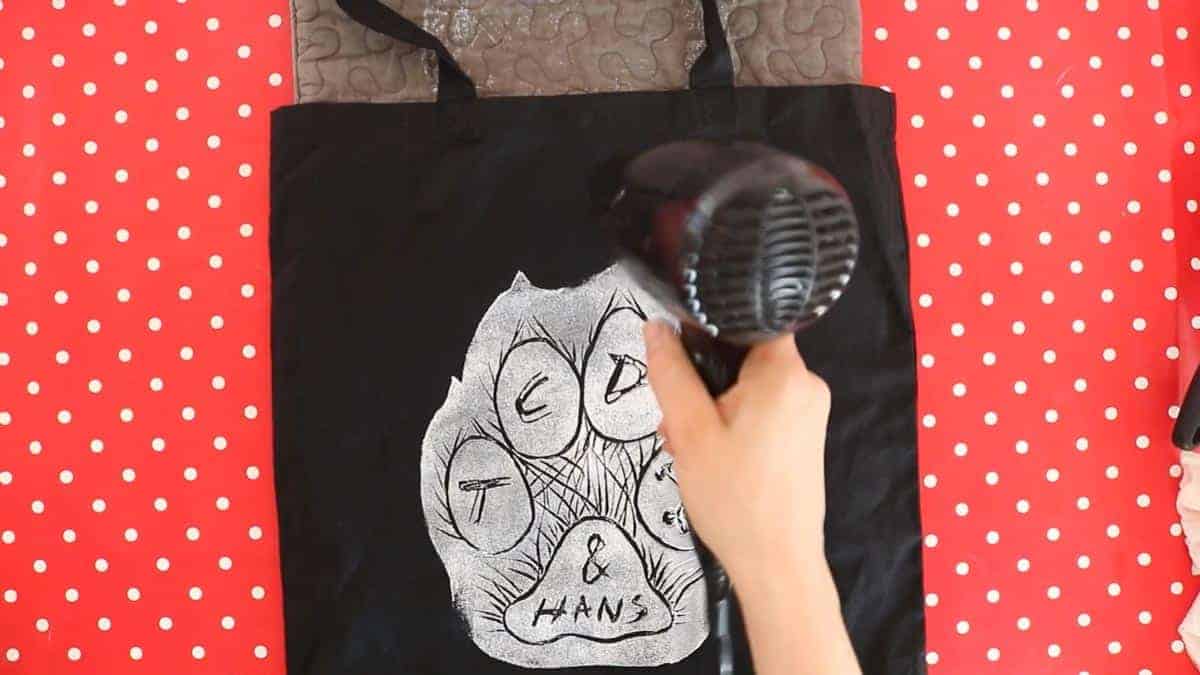
Once you transfer your ink design on to your fabric, you need to either let it dry naturally or speed up with a hairdryer. The latter being my preferred method. But you need to ensure there's no moisture left at all in the ink to cure properly. So I hair dry, hang on a clothes rail, then move on to the next before curing.
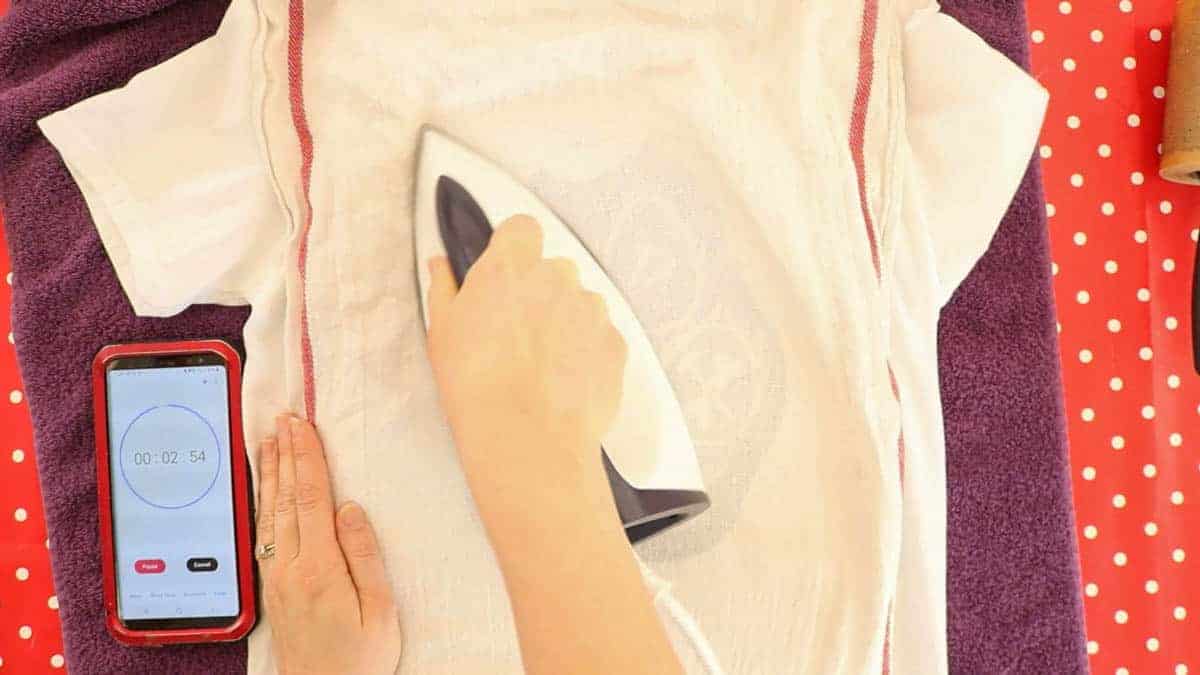
To cure, I place on a well-padded ironing board. Then place my t-shirt or fabric on top, cover with a fine tea towel or baking paper and iron over the design. Here's the recommended ironing times:
- Cotton: hand iron on a cotton setting (160c/320f) for 2-3 minutes
- Wool: hand iron on a wool setting (140c/285f) for 5-6 minutes
- Synthetics: hand iron on a wool setting (120c/250f) for 8-9 minutes
- OR, throw your item(s) in a tumble dryer for 30 minutes, which I tested on my samples and it STILL worked
It is VITAL that you heat cure Permaset. But if you have other ways to heat cure, then it's worth reading their datasheet here.

What Roller Should I Apply Permaset Ink With?
Before I created my final designs for my YouTube merchandise, I needed to do a series of testing. I also found there's a lot of different factors that can affect the results.
So I can't stress it enough that it's best to test on old t-shirts first. The first hurdle I discovered is that you can't use a hard rubber brayer to apply Permaset ink.
I found the random ink streaks from the ink tray also transferred to the shirt.
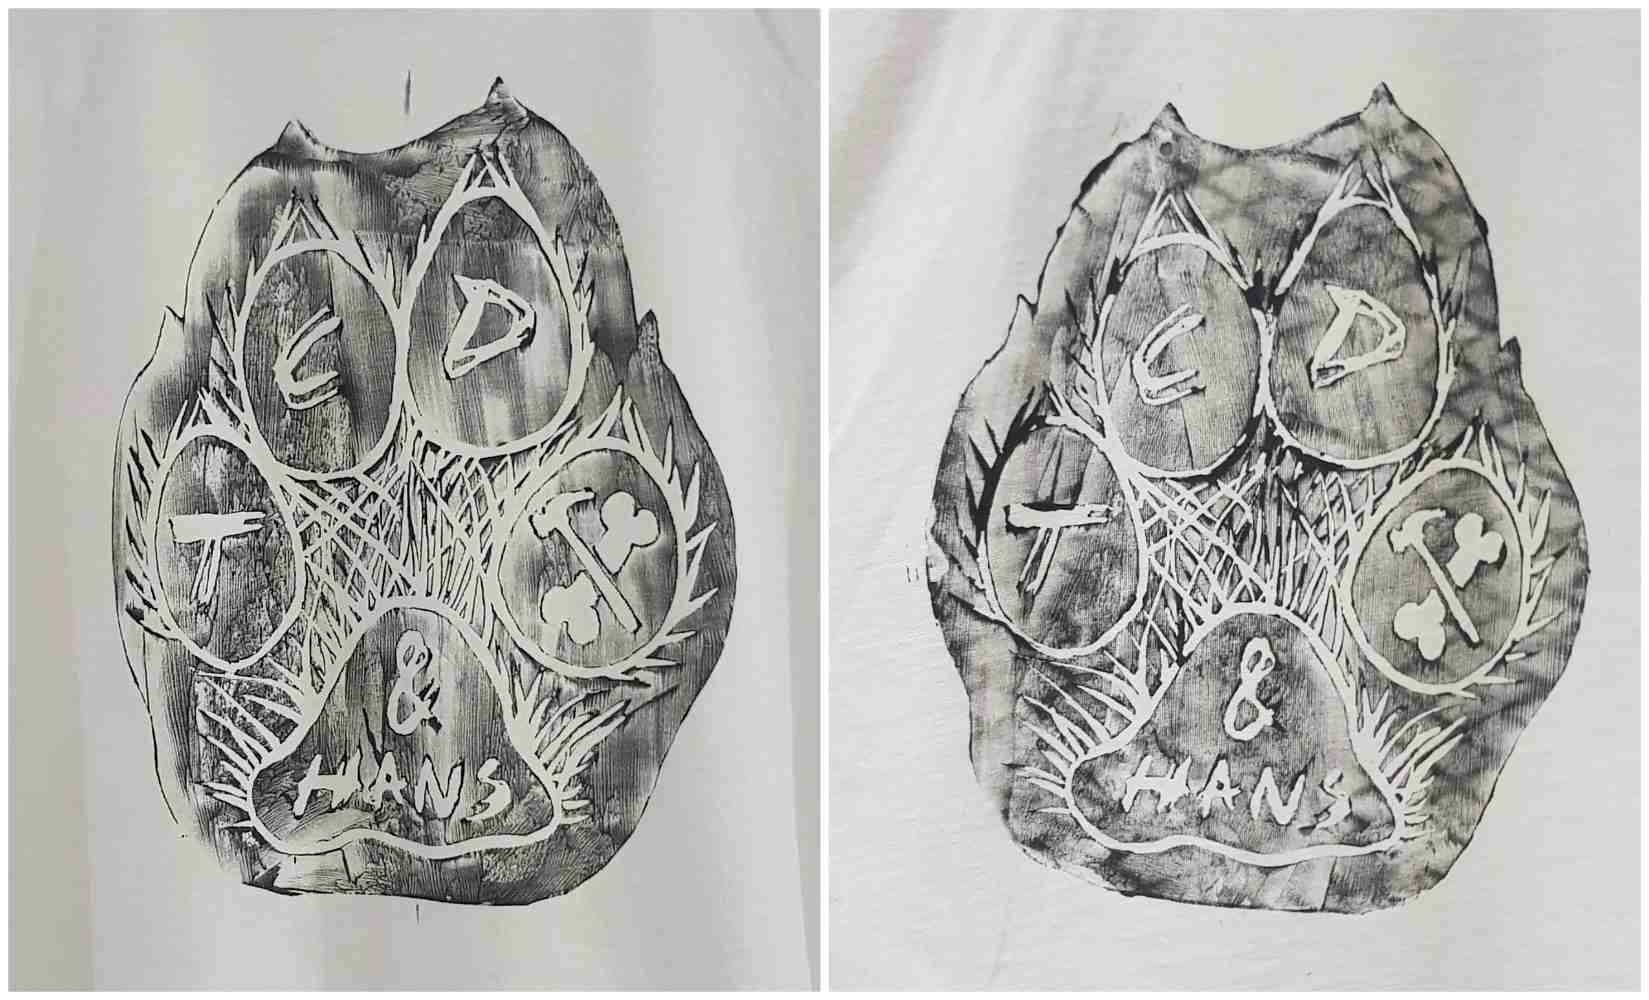
Now, this is OK if you want your linoprinting on fabric to look like this. However, if you were to use Speedball fabric block printing ink, then this method would work.
But remember, the cure times are drastically different. But after another try with the same roller, but using my padded ironing board also told me texture underneath would transfer through too.
So, it was vital that I used a foam roller instead. But which one was another tricky question? Further below, I'll leave a few test images for you to decide yourself, but that also answers my next question too.
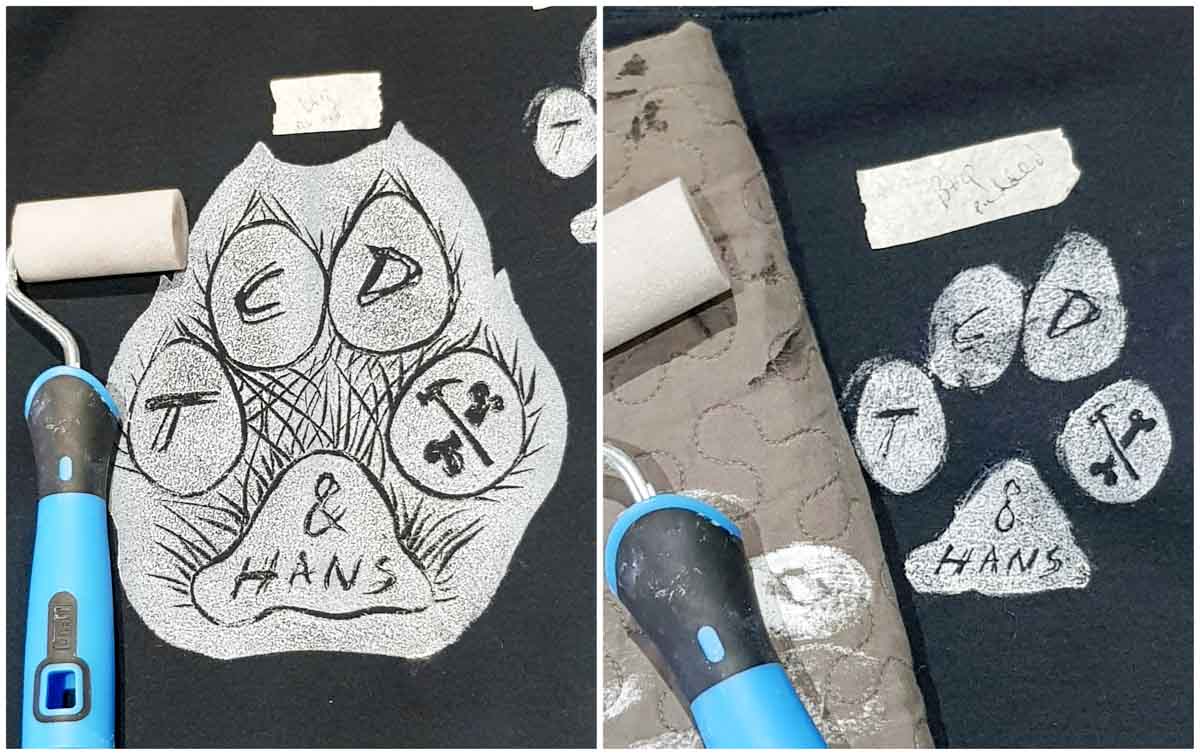
Left without padding
Right with padding
Should You Pad Your Fabric Underneath Before Linoprinting?
Many other linocut artists who print on fabric will tell you that padding underneath gives a better transfer. And perhaps that is the case with certain linos. However, with softcut lino, I found t-shirts were better without padding.
But interestingly, with a very fine pure canvas fabric, it was better with padding. Yet, for proper testing, I needed to trial with three different foam rollers on the same fabric. These were in the order of most expensive:
- Essdee textile roller - minimal sponge
- Essdee foam roller - holey-style spongey
- B&Q Dial 2.5" mini foam roller - a more high definition sponge
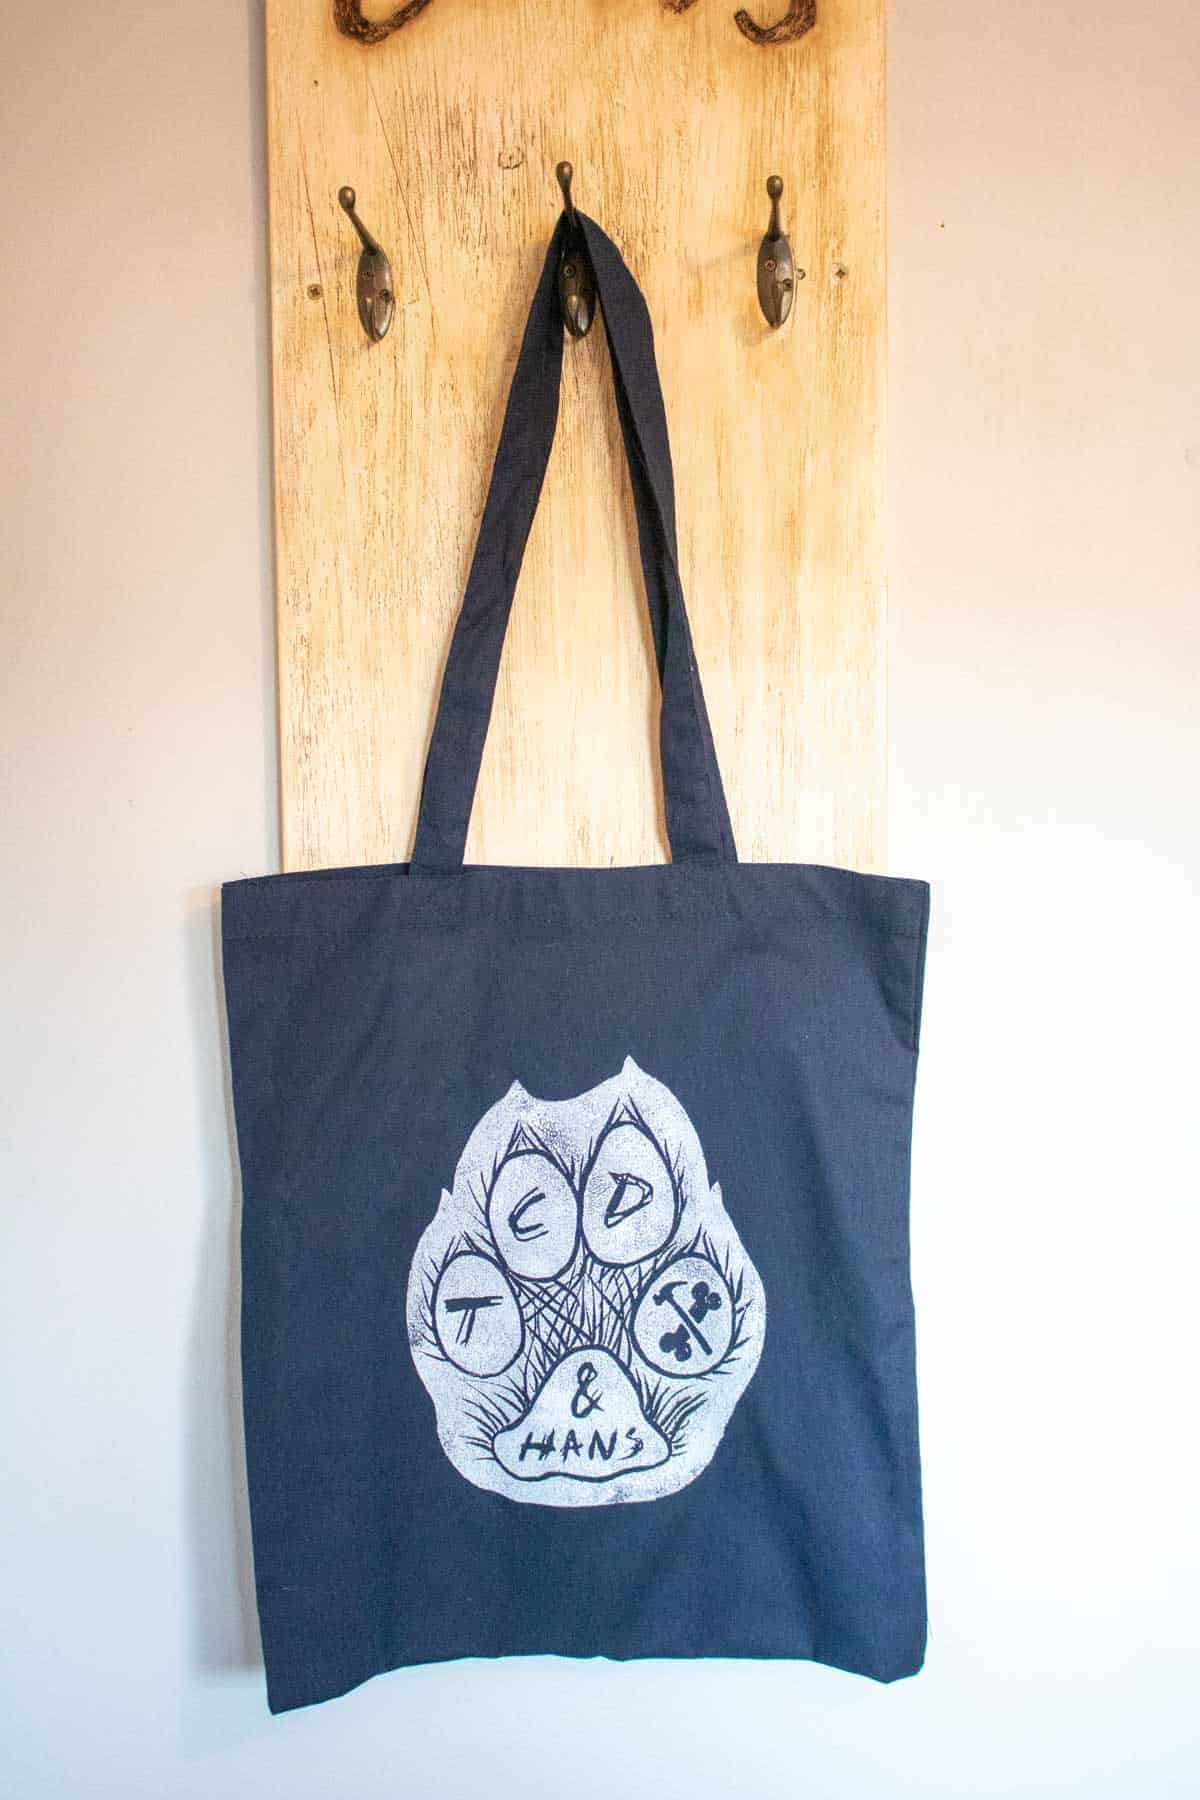
LINOCUT PRINTING TESTS WITH PERMASET AQUA
I found a thin cotton canvas fabric came out completely differently to a softer cotton t-shirt with padding, despite applying the ink the same way.
Above, you can see a canvas bag where I preferred the ink print transfer with padding underneath.
But with regards to tests on an old black hoodie and a white t-shirt, here's how they came out. The black is Permaset Aqua, the white is Permaset Supercover ink.
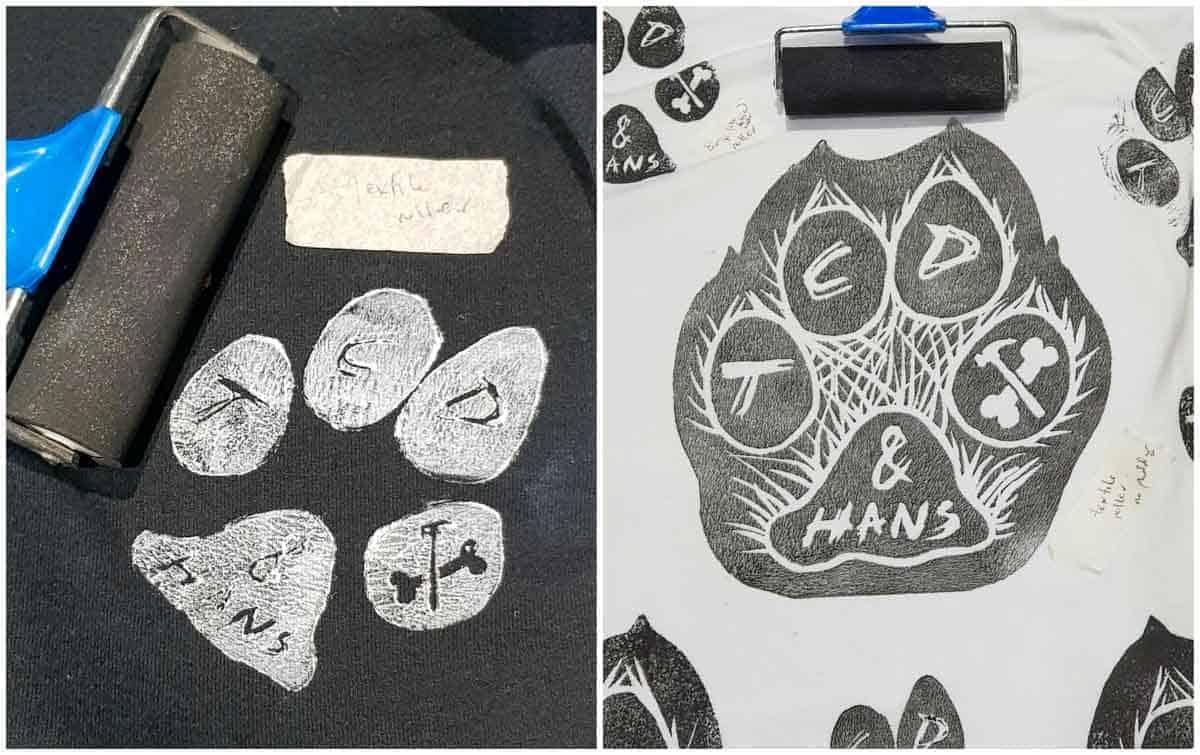
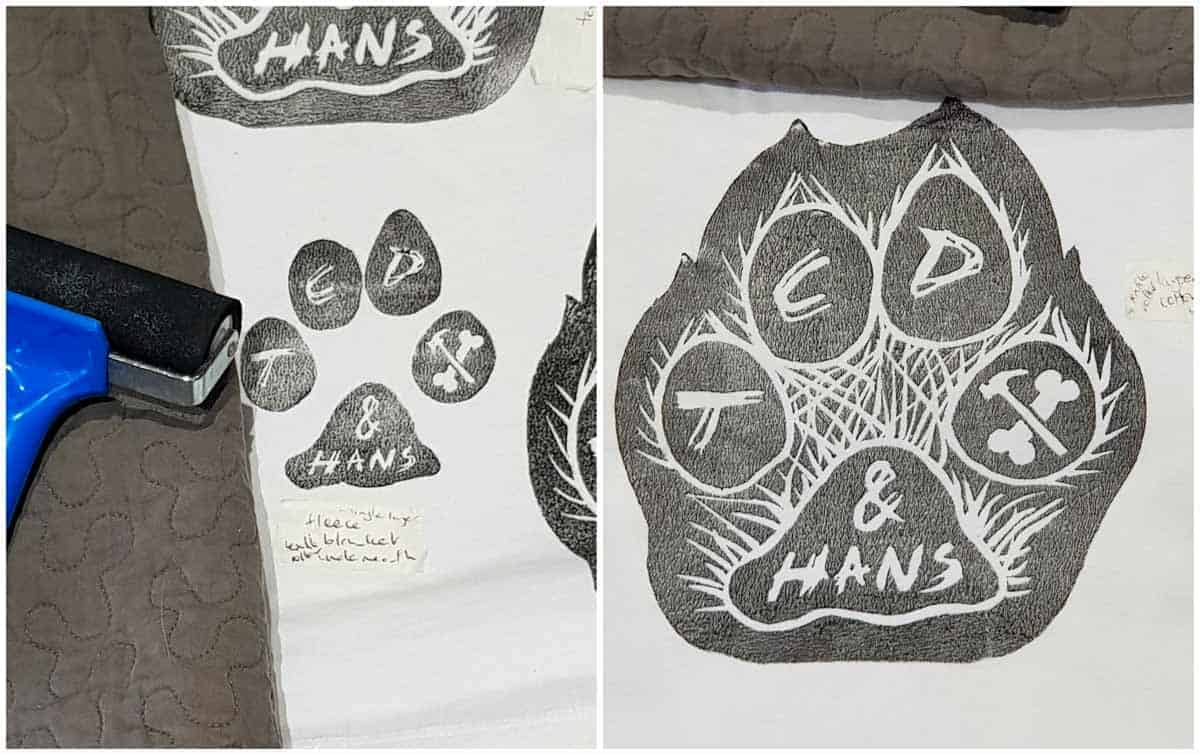
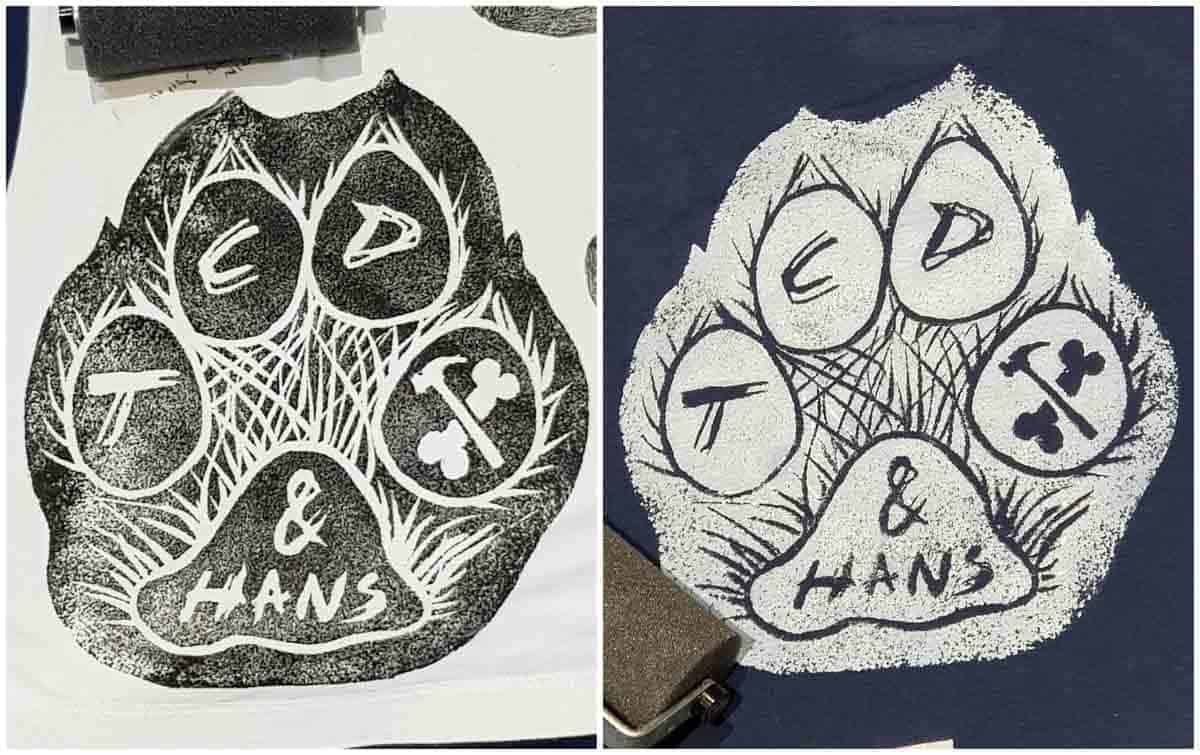
- However, I tested with padding on my an old hoodie and it was worse
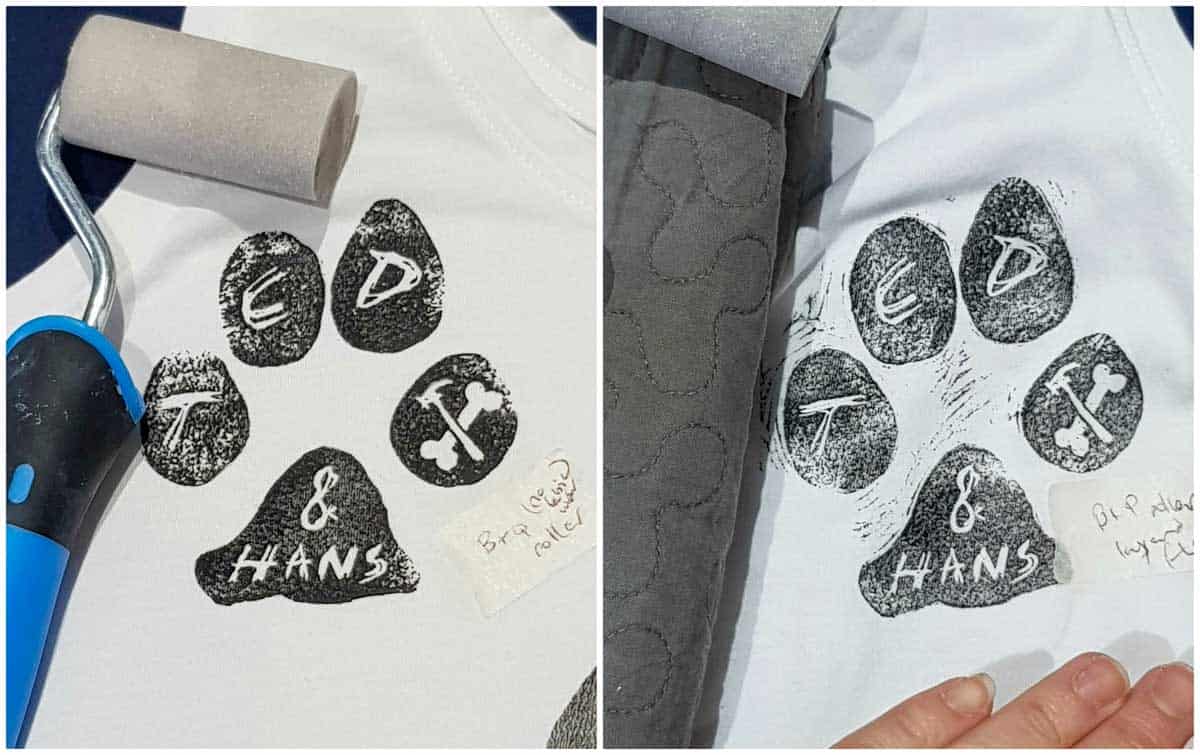
- Left: Without padding
- Right: With padding
THINGS I USED FOR LINOCUT PRINTING MY YOUTUBE MERCH
Before I talk you through the important steps, here's a list of all the tools I used.
- Ipiccy (free online editing software)
- A4 Tracing paper
- A4 Clipboard
- 2B pencil
- Japanese cutting tools for wood and lino
- Softcut lino
- Lino cutting set
- Permaset Black Aqua screenprinting ink
- Permaset Supercover White screenprinting ink for dark fabric
- Essdee sponge roller (MY 2ND FAVOURITE)
- B&Q mini 2.5" roller set
- Textile roller PERSONALLY, MY LEAST FAVOURITE ROLLER
- Icing sugar rolling pin
- Clothes steamer
- Clothes rail
- Omnigrid board
- Hairdryer
- Non-steam iron or heat tunnel
- Blank t-shirts - (I buy Gildan Preshrunk Softstyle Ring Spun in Unisex and Ladies fit)
- Cleaning wipes to hand
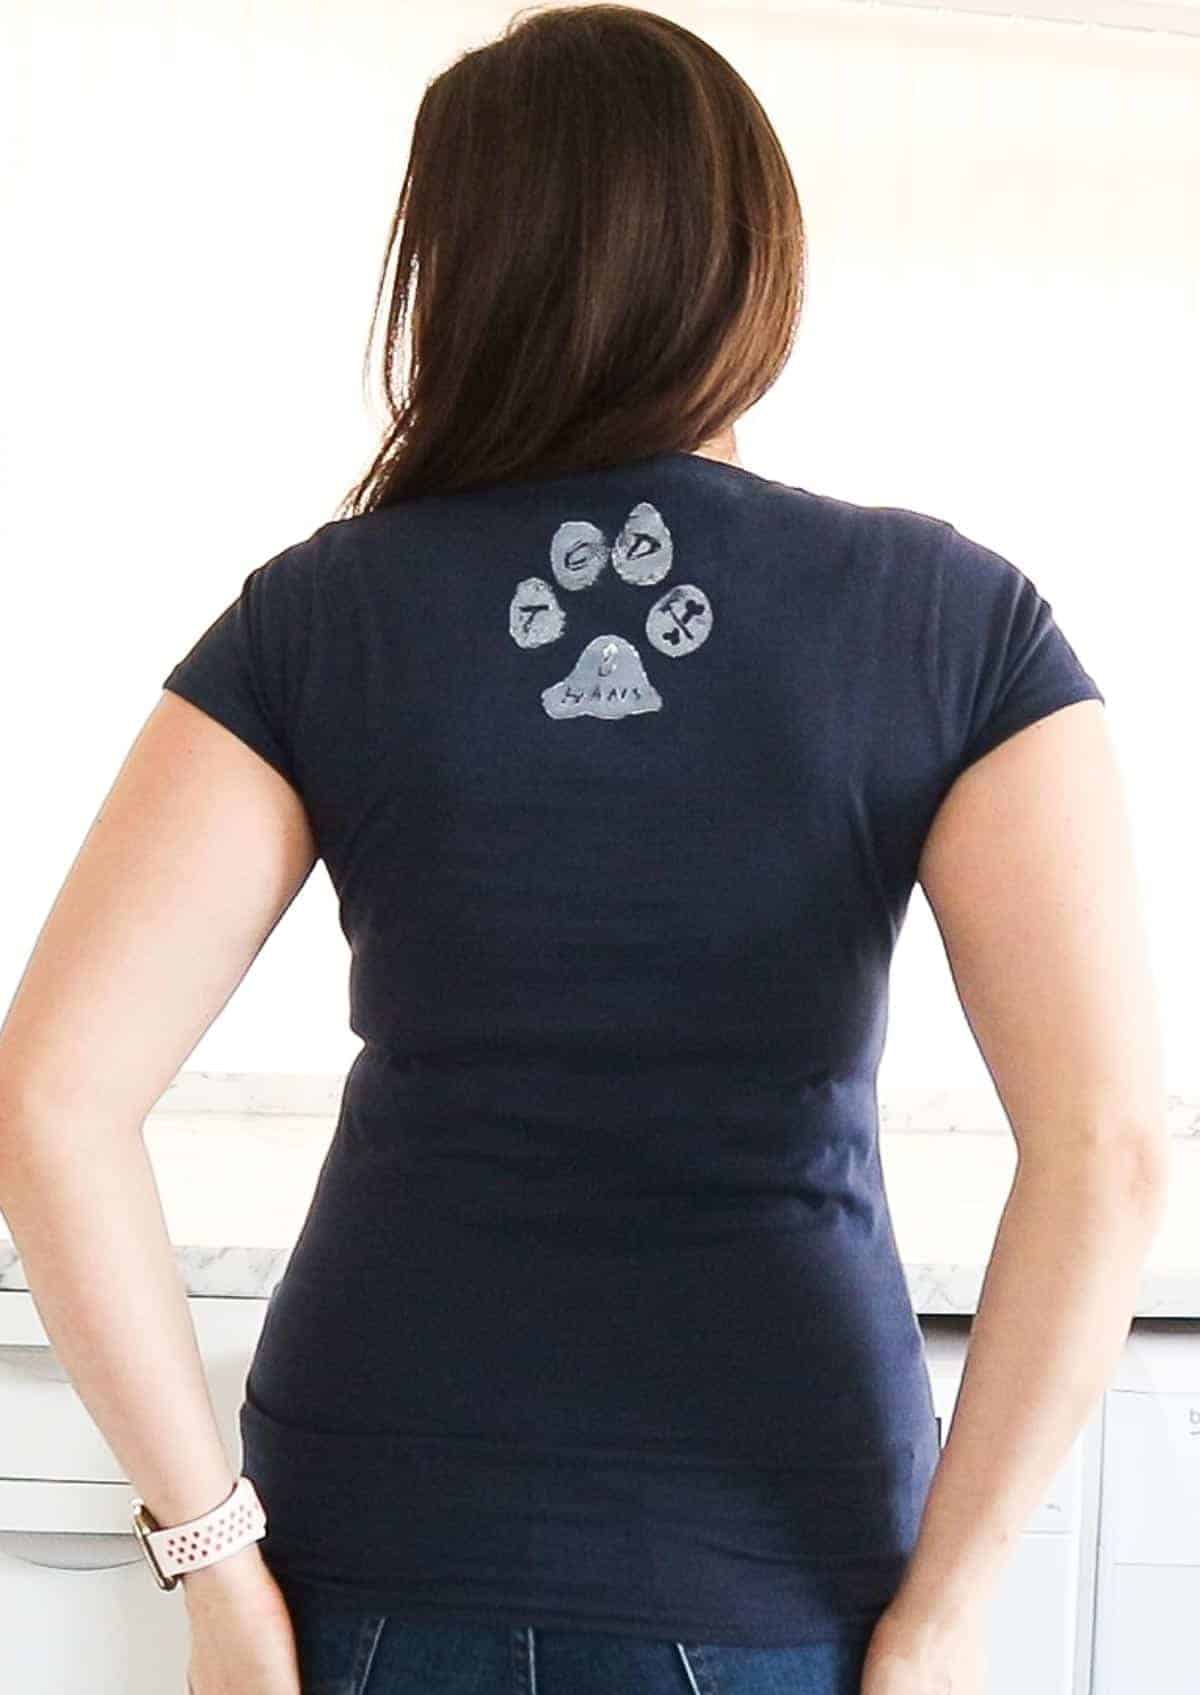
INSTRUCTIONS FOR LINOCUT PRINTING YOUR OWN YOUTUBE MERCH
First, you'll need to create your own design. And preferably one that will sell. I know it's also great to do research on these things, but you can't really rely on your audience as to whether they'll buy one or not. Please note, this isn't me saying my designs rocks and nor am I an expert in branding and marketing. However, I love it.
But remember this: your subscribers saying or asking for more choices in your design doesn't mean they'll buy it. Committing to buy is a completely different story. So my advice is: limit your customer's choices initially as this can lead to procrastination and no sales. And you may be the only person who likes it.
And according to Chris Voss, author of Never Split the Difference, you're more likely to have success if you put a time limit on your time-to-buy. (That's my slightly paraphrased version).

CREATING MY LINOCUTTING PRINT DESIGN
I used a photo I took last year which I used in his dog kennel design. Hans had stepped on some plywood. Then I coloured the pad with black and reuploaded to Ipiccy.com before overlaying with font.
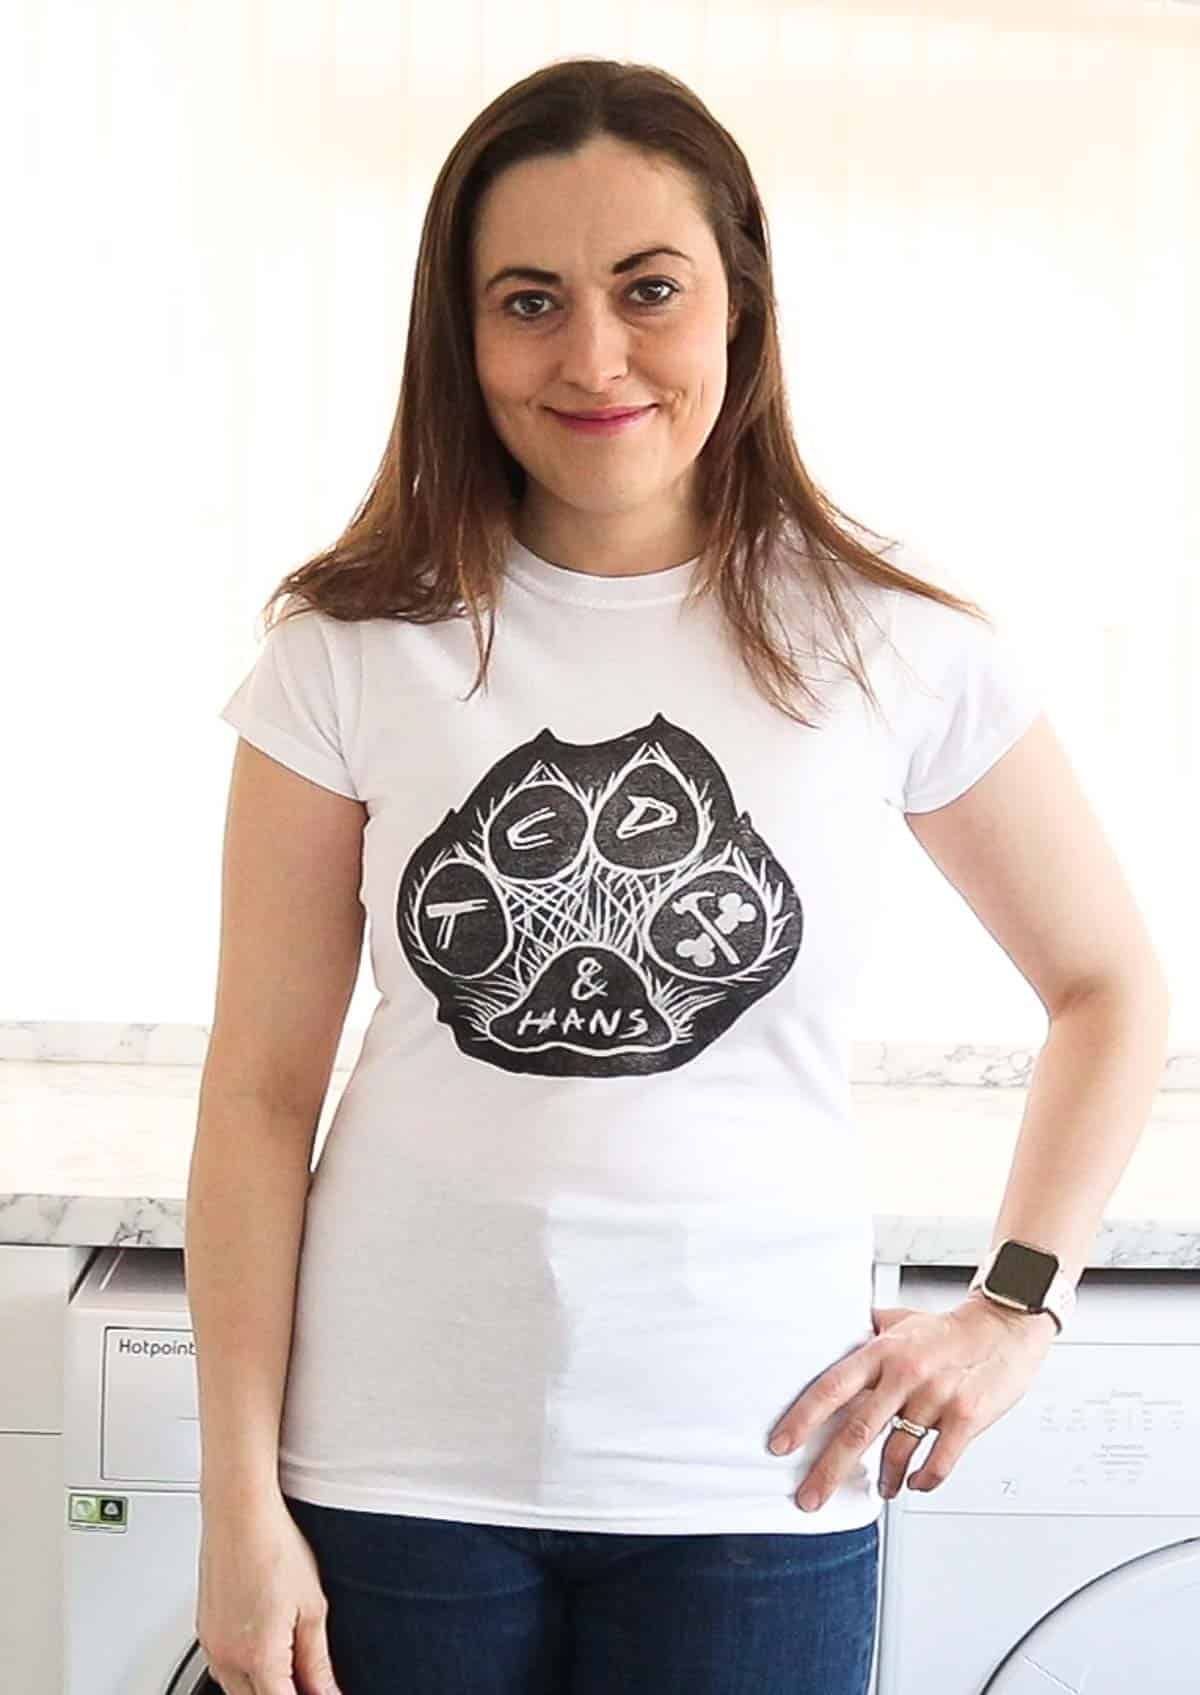
I'd also drew some very basic images of a hammer and bone in Microsoft Paint, then made the background transparent in Photoshop. This also allowed me to upload after to Ipiccy and create a cross. So this resulted in "TCD & Hans".
I see my border collie, Hans as my workshop assistant or mascot. He's my chum who keeps me entertained in the day. We're a pact.
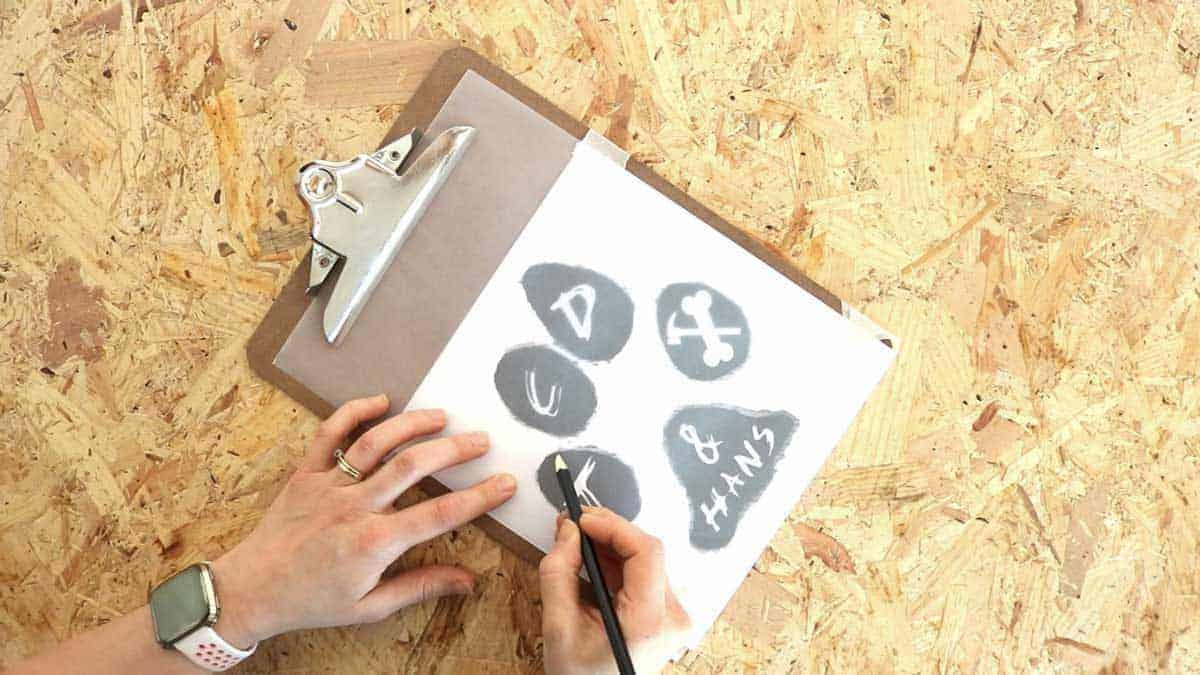
TRANSFERRING YOUR DESIGN TO THE LINO
The part that people find confusing, especially with text, is that we need to mirror our design. So, putting it simply, here's a guide to follow where the lino is the mirror in the middle to your image:
- Print or draw your design the right way
- Transfer it to the lino face down, which will reverse it
- Then when you come to transfer your design to fabric, it'll be correct again.
So, after printing my design, I placed tracing paper on top and drew around all the detail with a 2B pencil. Or I could've drawn on the print off instead.
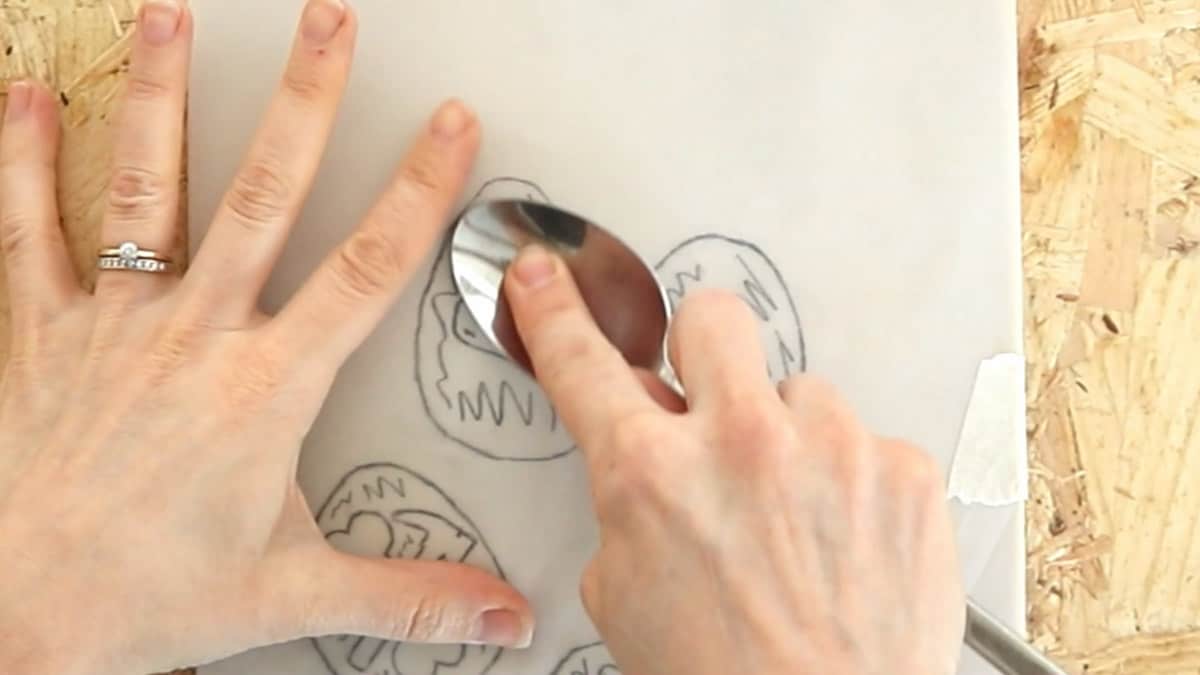
Then place the transfer paper facing down ontop of the lino and temporary fix in place with masking tape.
Using a spoon, rub all over the back of the tracing paper. The pressure will transfer your drawing to the lino.
And when you remove the tracing paper, your design on the lino will be in reverse.
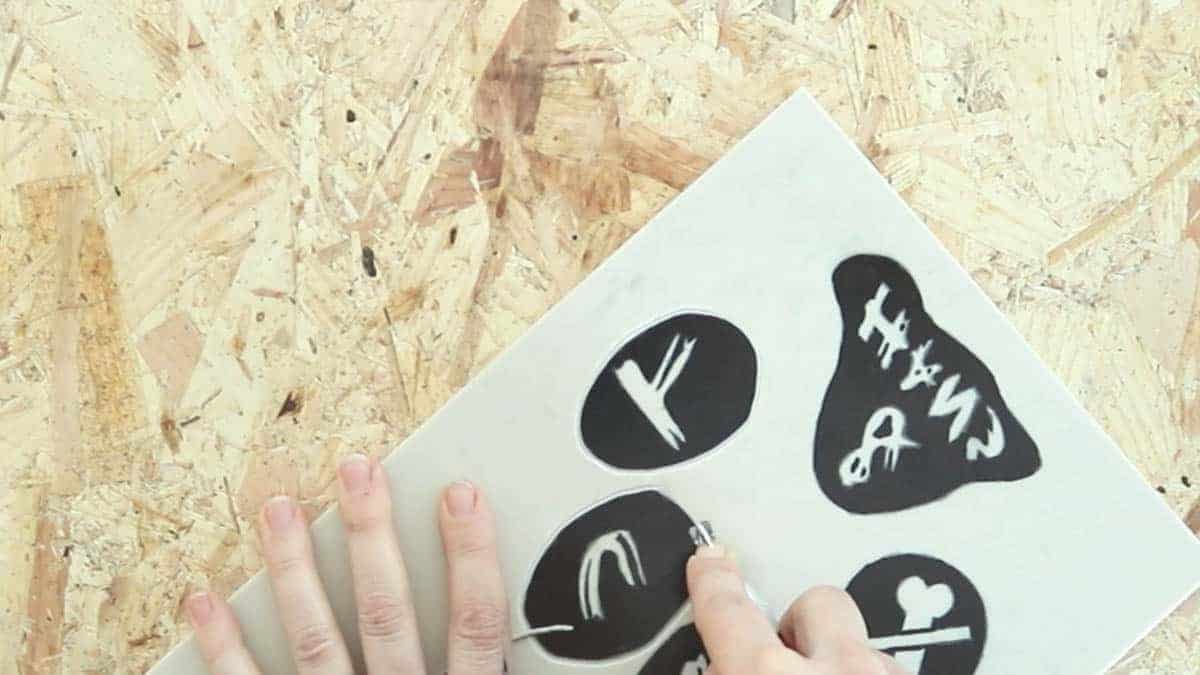
CARVE YOUR DESIGN
You may feel pencil will rub away easily. Mine, in fact, did not. Yet I felt compelled to blackout all the places I didn't want to carve with a marker pen. This is OK if you're using softcut and remove it later with mineral spirits. Otherwise, the texture from the marker pen can transfer to the final design.
Now to carve, start working on the outlines with your linocutting tools. I first used the Essdee one with wings which is great for newbies. However, I found the V shaped tool in the Japanese set to be even better. Use the finer tools for fine detail.
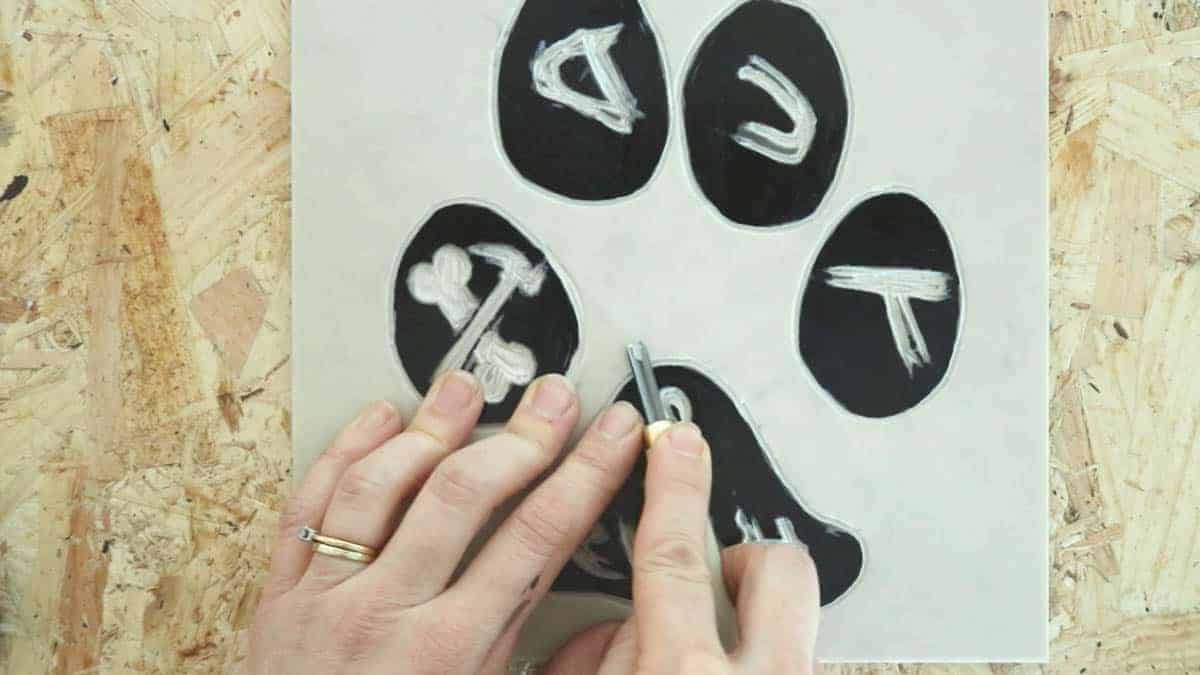
But when you work on larger areas to cut out, the curved gouges will speed up the process.
Also, make sure you're cutting away from your hands. Rotating the lino as you carve will help.
You may prefer a bench hook, but I didn't need one. You can see my video on how I carved mine here.
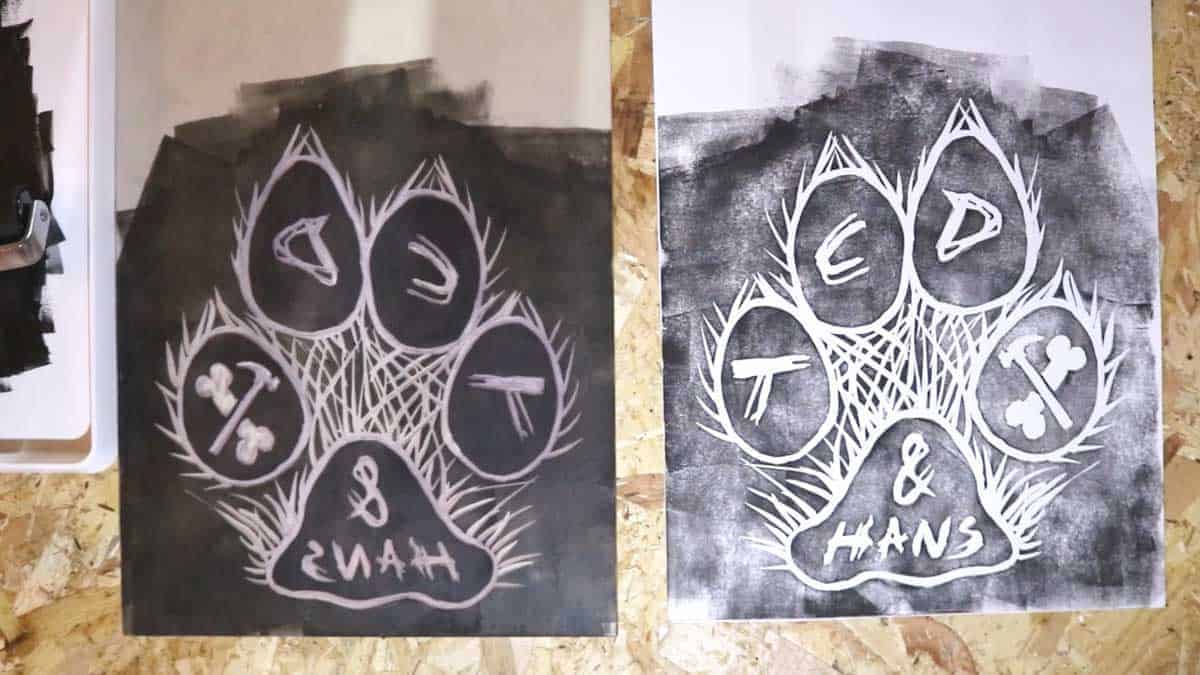
TEST YOUR LINOPRINT ON PAPER
Once you've carved out your design, it's a good idea to test on paper with basic ink. I used the Essdee ink that came with the linocutting set.
I didn't use as much one would for a final look, but it gave me an idea where I wanted to go with it.

LINOCUT PRINTING ON TO T-SHIRTS
Once you're happy with the amount of testings you've done (see the Testing section in the notes above), it's time to print!
I made a very quick jig with my Omnigrid board, allowing me to find centre each time, depending on the size of t-shirt. Then I laid the t-shirt flat, wedged a large folded up piece of wallpaper inside to prevent ink running.
Use a lint roller to remove any fluff off the t-shirt.
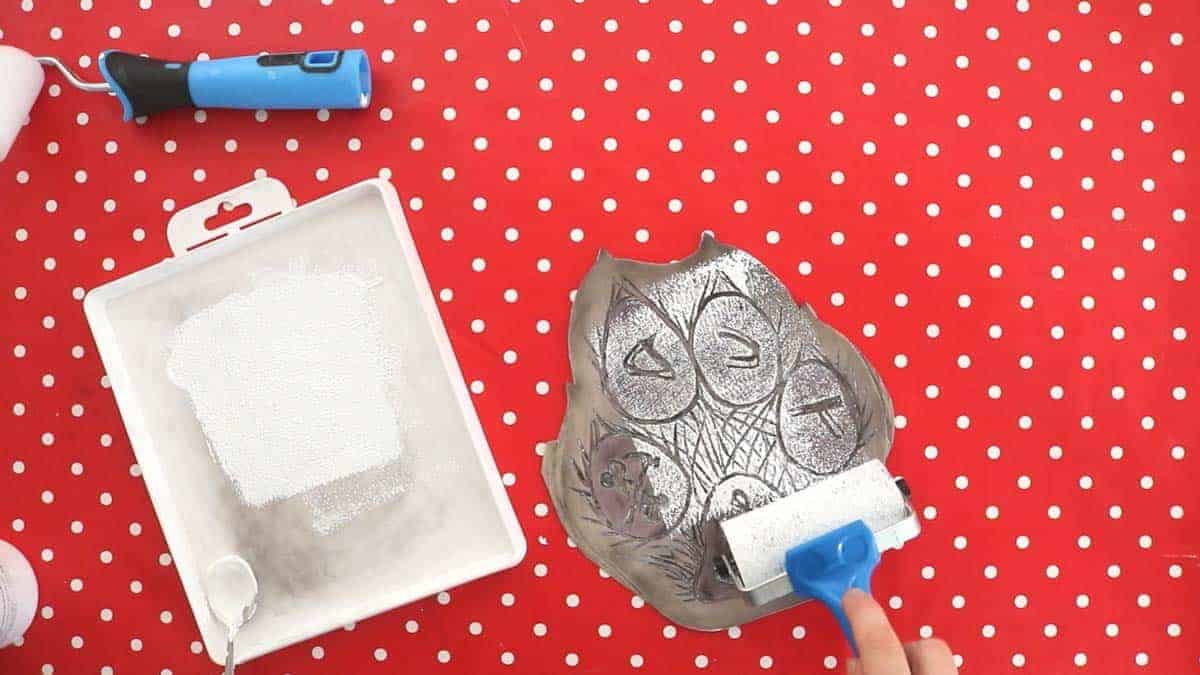
APPLYING PERMASET INK
Now add a teaspoon of the Permaset ink to an ink tray and roll out with the foam roller of your choice. Then apply to your linocut design. Don't be too heavy with this and roll over with thin coats, otherwise, the ink can run into the cracks. However, it is unavoidable, but as long as you're not heavy-handed with the ink.
Apply in every direction, ensuring there's no lines from the ends of the foam roller. Wipe any excess off where you see it on the areas you don't want to show ink. Then press down on your t-shirt. If you have any ink on the back of your lino or your hands, wipe off now before it's too late.
If you do get ink elsewhere on your t-shirt, which doesn't happen often, it's very difficult to get off. For example, if you try to baby-wipe ink off a coloured t-shirt, it's likely to show wear on the fabric in that spot. In this unfortunate instance, I claim it as my t-shirt.
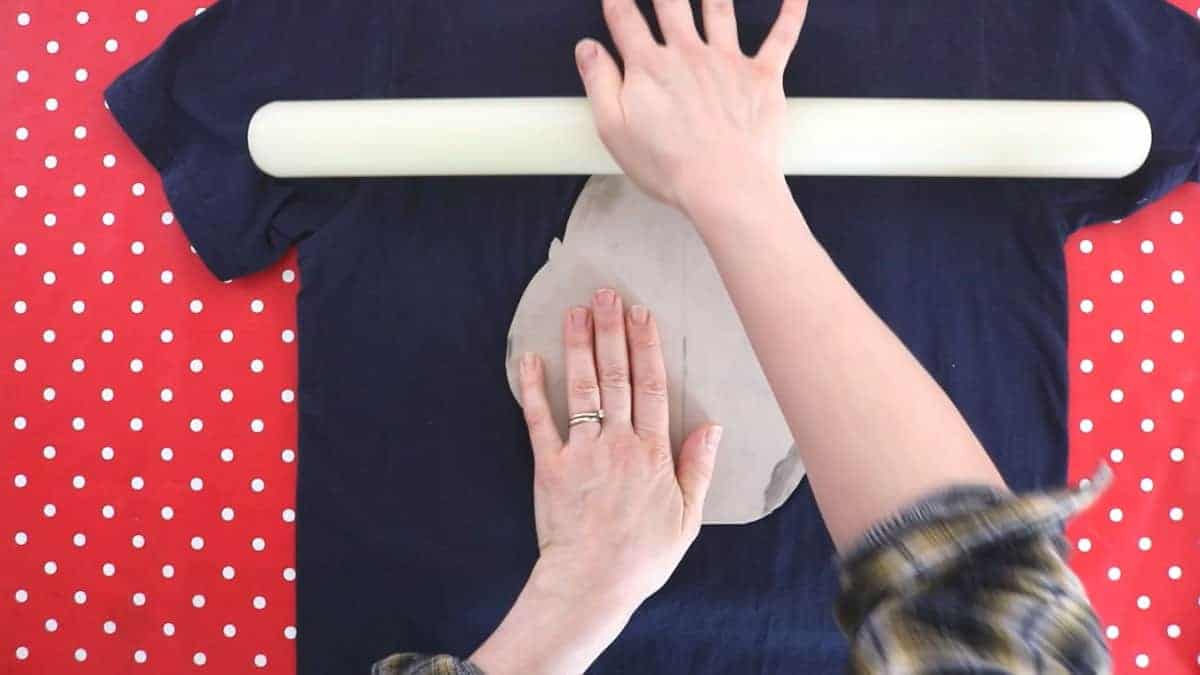
PRESSING YOUR LINOCUT DOWN FOR A GOOD INK TRANSFER
In your series of tests, you'll probably have found out by now which method works for you. This is the only time I would use the hard rubber brayer, pressing down on the back of my linocut design.
But I later found that my heavy icing sugar roller was much better. Some people even stand on their lino, but I'd do this with caution as it sounds gross!
However, when you are pressing down, press/roll in every direction, focusing on the edges, too. But remember, each one will turn out different. And in my eyes, that's what makes each one unique.
HEAT FIXING YOUR BLOCK PRINT ON FABRIC
After peeling off your linocutting print, you'll need to heat fix your t-shirt or fabric. I'll give you a recap again as this is a VERY indepth post:
- Let air dry or hair-dry it to remove all ink moisture
- Cover your design with baking paper or a fine tea towel to avoid iron marks
- Iron your design for 2-3 minutes on cotton with pure cotton. Scroll up for other fabrics.
Your t-shirt can now be washed.
OTHER LINOCUT PRINTING YOUTUBE MERCH TIPS
Here are some extra linocut printing tips to remember:
- Test wash your first t-shirts to ensure you don't ruin a good batch of tees. They may have starch in them
- Only buy a number of t-shirts you can afford to lose, assuming you won't sell any
- Buy tees for you in your size, again, assuming you won't sell any. The worse case, you're building your own wardrobe, which you can promote over time in your videos
- These make great low-cost competition prizes if you want to grow specific social media platforms
SELLING YOUR LINOCUTTING PRINT DESIGNS
If there's one thing you should have learned already, that's: start small and don't give too many options. I also wouldn't invest in a separate site just yet, like Shopify.
I personally think it's best to add an existing Buy It Now feature on your current blog. And if you don't have one, you may not know that most bloggers get paid more with views per ad than YouTubers do per view. I blog here via self-hosted WordPress. If you don't have time, then a free trial Shopify may be best.
I set up my shop links using the Woocommerce plugin for WordPress. There's some important factors to note when trying to sell your linocut printing designs:
- Make sure your version is compatible
- Back up your blog before installing (which you should be doing anyway in case you break it).
And I'm going to leave you with this BRILLIANT Woocommerce video tutorial which I followed. And more importantly, good luck.
Linocut Printing T-shirts for Youtube Merch

A comprehensive guide to linocut printing for your own YouTube merch. I talk you through the basics of how to start, what type of lino and ink to use and setting up your own online shop.
Materials
- A4 Tracing paper
- 2B pencil
- Softcut lino
- Permaset Black Aqua screenprinting ink
- Permaset Supercover White screenprinting ink for dark fabric
- Blank t-shirts – (I buy Gildan Preshrunk Softstyle Ring Spun in Unisex and Ladies fit)
- Cleaning wipes to hand
Tools
- A4 Clipboard
- Japanese cutting tools for wood and lino
- Lino cutting set
- Essdee sponge roller (MY 2ND FAVOURITE)
- B&Q mini 2.5″ roller set
- Textile roller PERSONALLY, MY LEAST FAVOURITE ROLLER
- Icing sugar rolling pin
- Clothes steamer
- Clothes rail
- Omnigrid board
- Hairdryer
- Non-steam iron or heat tunnel
Instructions
- First, you need some hand-drawn image using 2B pencil, or a print off that you can draw around.
- Then place face down on your lino, secure with masking tape and rub on the back of it with a spoon until it has transferred.
- Remove the drawing, then you might want to pencil in any areas you DON'T want to carve.
- Now, using your linocutting tools, carve out the areas you don't want your ink. See my instructional video here for guidance: https://youtu.be/Gcd11soNnSg
- Then cut down your design with scissors if needed.
- Lay out your preshrunk t-shirt and place card inside to prevent ink leaking.
- Using a foam roller, add a teaspoon of Permaset in on to the ink tray and roll over with a foam roller.
- Apply ink on to your linocut print in every direction, then place down on your t-shirt.
- Roll over the back of your linocut print with an icing sugar roller, again in every direction and pull the linocut off to reveal your print.
- Blast the ink pattern with a hairdryer to remove moisture.
- Then place the t-shirt on a padded ironing board, layer with baking paper or a fine tea towel and iron over for 3 minutes.
- It's now ready to wear and wash or post to your customers!
Visit My Etsy Store for Lino Cut Art
Since sharing this tutorial, I've also fallen in love with printmaking on paper and creating artwork from our travel pics.
You can find them in my Etsy Store, Carpenters Daughter GB here, which is new for 2022.
I am also posting overseas in plastic-free and eco-friendly packaging, including the acid free recycled paper I print on.
PIN THIS LINOCUT PRINTING TUTORIAL TO MAKE YOUTUBE MERCH


Comments
No Comments