
Are you ready for the growing season? Maybe your seeds are germinating, but you don't have protection yet? If not, then don't worry. Here's my simple hinged DIY hoop house instructions.
You won't need to buy plans to match your vegetable garden bed! It includes a YouTube how-to video and alternative ideas.
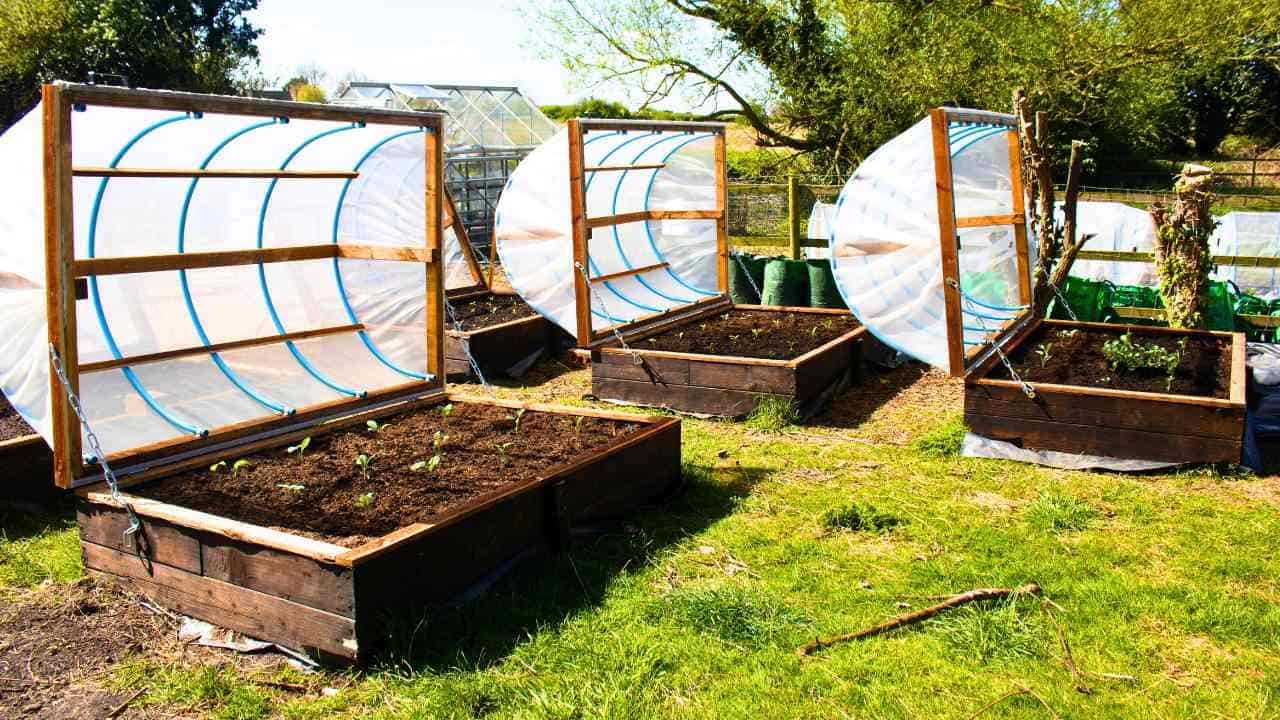
Last year I made cold frames, but this year on our new farm, I've been making a lot of garden beds to grow vegetables. But after installing a Ring security system and seeing Muntjac deer, I realised I needed to add some protection!
After watching endless YouTube videos, I found an array of projects using tube straps, or flat wood drill bit holes created for 1 inch PVC pipe.
This design was inspired by Huw Richards' hoop house, Geoff Hamilton's Gardener's World design and many other ideas I saw on Instagram. I've just tweaked both of them to what I thought was better.
Jump to:

✔️ Why You'll Love This Project
Here are a handful of reasons why we think you'll love making this hoop house frame for more permanent solutions!
- Ideal for cold weather in early Spring or late fall with a plastic row cover to extend the growing season
- Install insect netting instead of a plastic cover to reduce prevent unwanted pests on brassicas and cool crops in the Summer months that are self-pollinating. This means healthy plants and higher yields!
- It can be designed around any size wooden raised bed frame (see my trick in step 1)
- They create a controlled environment, trapping the heat and protects from heavy rain and high winds. Even ultrafine insect netting can create a windbreak
- It's cheaper than buying a polytunnel and ideal for small gardens as they don't take up a lot of room.
⚒️Tools and Materials List
You can refer to my shorter printable guide in the how-to card at the bottom of this post. However, I recommend reading the entire post as I have more detailed tips, tricks, and step-by-step images.
Please note that as an Amazon Associate, I earn from qualifying purchases made through affiliate links.
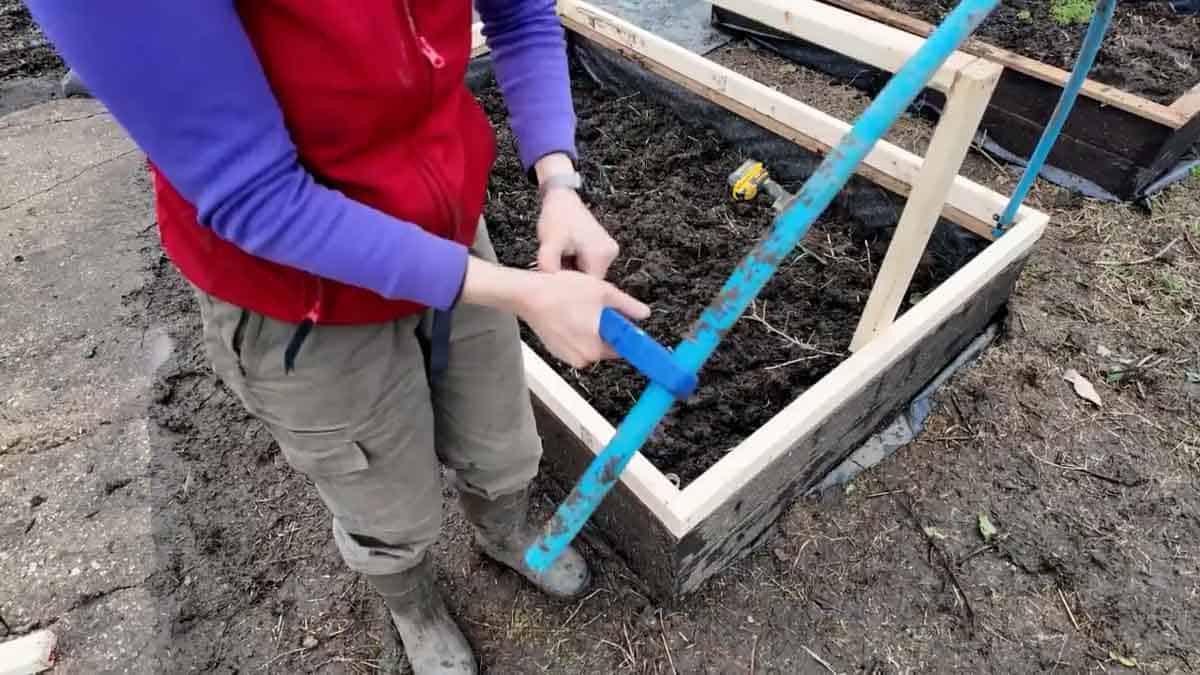
- 25mm polypipe - This is to create PVC hoops, arched over the top for a rigid structure. Or you could use thinner pipe, or even Speedfit 15mm pipe found in more local stores, but it is more expensive
- Plastic pipe cutter - note you may wish to buy a bigger one to cut pieces of PVC pipe. It is designed to only cut up to 22mm, but I just about managed with 25mm pipe. Or you could use a hand saw
- 25mm pipe clips - this is to keep the pipes secure and in place, fixed to the framework. Alternatively, you could drill 25mm holes in the frame to slot the pipe in. I recommend checking hardware stores.
- Clear tarpaulin - I recommend buying from a reputable polytunnel company. In my original video, I used a B&Q Verve cover and it is far too thin, hence moving on to tarpaulin or insect netting
- Cast iron handle - installed at the ends for easy opening. These should not rust and they're big and robust enough for the job
- Hinges - these are basic stainless steel door butt hinges, where pilot holes and screws are required to attach the lid and bed together
- Cabin hook - this may not be entirely necessary, but I have installed it as a precaution incase any high winds try to lift the lids
- Heavy duty stapler - Note I cannot recommend the one I use as it is very hit and miss and will be buying a different one, but you need one that staples your greenhouse plastic to wood
- Rustproof staples - I used 14mm staples that should not rust while exposed to the elements
- Stainless steel wood screws and washers - this is to secure the plastic to trim on the long sides of the bed, where the washers create less chance for the sheeting to tear
- CLS structural timber 38mm x 63mm in 2.4m lengths - or 1.8m long if your bed's longest length is shorter
- Wooden slats - or wood used to make trellis is perfect for this as these are trim pieces used to roll plastic sheeting around and tighten before fixing to the sides of the hoop house
- Combi drill and drill bit
Note: the easiest way to attach the plastic where you can swap plastic sheeting for a net type plastic covering is to use these polytunnel clips, which you can buy in a variety of different sizes
📋 Step by Step Instructions
Please note each subheading is clickable to the specific time stamps of my YouTube video to help demonstrate what to do.

The easiest way to get your cut marks is to position a length of CLS along the shortest side of the bed (right in the corner) and mark with a pencil where the other end of the bed finishes.
Tip: I do this while the slimmer sides of the frame are facing the ground.
Cut 2 pieces to this length (one for both ends).
Then push them together while in line with the shortest end again and position a longer length against (see pic) and mark where the longest side finishes.
Cut this twice. You should now have a box frame.
You will also need to cut 2 x 2ft pieces, or taller if you wish.
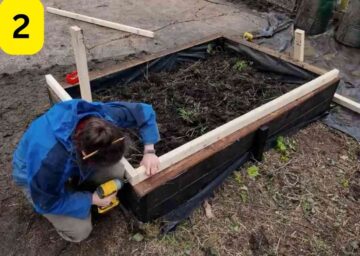
Next, drill and screw all of your 4 pieces together. I used long 70mm screws, or use similar.
Note: don't skip predrilling as your wood is likely to split.
Then mark centre of your shorter sides using a tape measure for your 2ft uprights (or thereabouts) and place them inside the frame.
Predrill and screw them together. I used 3-4 screws for this are.
Note: you could position them on the top of the frame, but you'd need very long screws.

Now you'll need to cut a support piece for the top.
To get this measurement, place a long length underneath the frame at the bottom, in line with the uprights.
Now mark between it and cut.
Note: don't take the internal measurement from the top as it will be out.
Then get a friend or a couple of clamps to hold it in place while you predrill and screw it to the top.
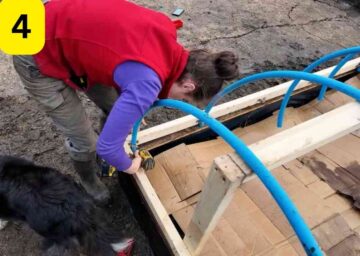
4. Cutting and attaching the pipes:
First, screw a pipe clip in the corner of the inside of the longest sides of the frame .
Now push some pipe in one of the clips (we'll cut some down shortly), and arch it over the frame.
Now the trick is to cut a piece to a manageable size, but make sure it's a bit longer than you need.
Then cut a little bit down and test to see if it fits in both pipe clips without any gaps at the top of the support.
Once you're happy, use this as your template and hold it against the coil of pipes to mark and cut again.
I cut enough for around every 40cm.
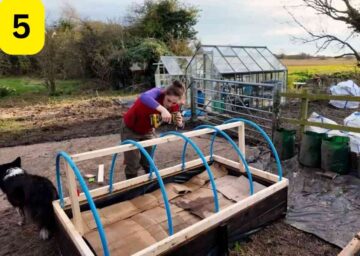
5. Screwing the pipes in place:
Now evenly position your pipes every 400mm/40cm (or thereabouts) (40cm).
Then drill screw holes top centre of each pipe, then screw the pipes down to the top rail (AKA ridge pole).
For the end hoops, make sure the pipe overhangs by about 5mm to make sure the sharp edges of the wood don't catch on the plastic later.
I also recommend screwing the pipes to the frame just above the clips for extra strength.
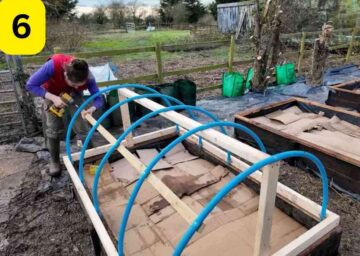
To remove any movement from the pipes, I slot in a long slat (this is a narrow strip of wood) inside the frame.
The hold against the top rail and mark and cut. You need 2 of these.
Then drill and screw these halfway down the arch and repeat for the opposite end.
Tip: I cut a scrap piece of pipe down as a jig to use for reference to drill evenly all the way across.
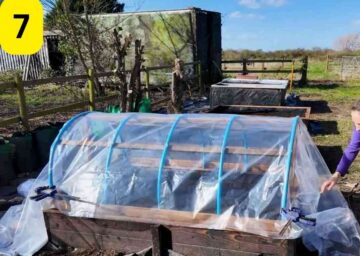
7. Covering the hoop house roof:
Now place your clear plastic cover or netting over the top of your arches.
Ensure you have enough plastic overhanging on the short sides of the raised bed will you can trim down after stapling.
Tip: clamps help to keep it steady if windy, or try to do it indoors or under shelter if raining.
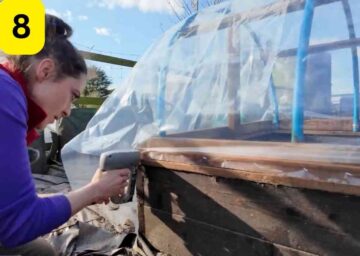
8. Stapling the plastic to the trim:
Now cut some trim down to the same length as your longest side of the frame.
Then position it in line with the longest end of your plastic (which should be a factory cut).
Then staple to covering to the wood every 10cm or so.
Wrap it underneath a couple of times if the length allows you to.
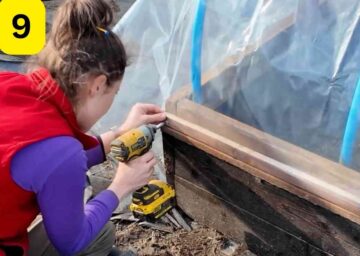
9. Screwing the trim to the frame:
Now line up the trim to the frame.
Then drill and screw the trim while also using washers.
I did this every 20cm or so.
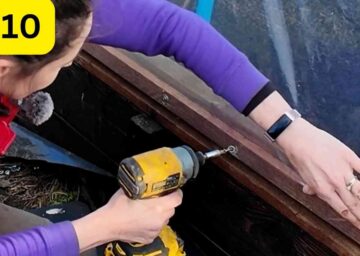
10. Tightening the plastic sheet:
Now go to the other longest side and staple the plastic to another piece of trim.
Then roll the trim while making the sheet tight as you can without ripping the plastic.
Then drill and screw the trim to the frame with washers.
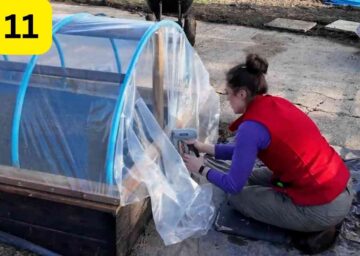
11. Covering the short side of the raised bed:
Now pull the centre of the shorter end of plastic down to make it tight and staple to the wood.
Then carefully pleat fold and staple the excess as tidily as you can and repeat, working your way outwards until you have no excess left.
Repeat for the opposite end.
Tip: if your excess is touching the floor, this can bunch it up, so you may be best trimming it a little first for even pleats.

12. Adding trim:
Now cut some trim to the same width of your frame (this is your new width with the added trim on the sides).
Then drill and screw the trim to cover the pleated plastic.
Note: you don't need to use washers for this, for a good look, I recommend it to match the rest.
Then slice off the excess plastic with a utility knife or scissors.
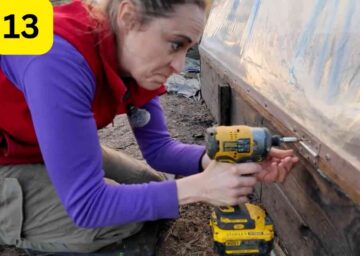
13. Adding hinges:
Next, position, predrill and screw 2 hinges where the lid and the base meet.
I roughly positioned them about 8 inches from either end.
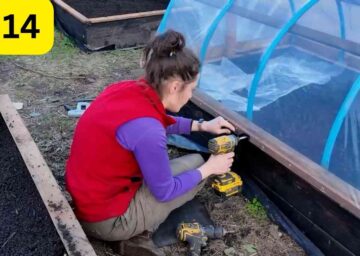
14. Mounting a handle:
Now predrill and screw a handle to the lid for easy opening.
I don't recommend adding it in the middle as I do here, as it makes it difficult to reach over to open while chains are attached.
Instead, add it to one end, or better still, add one on either side if you can afford it.
Tip: I also recommend adding chain on both sides for extra support if windy. For this, I cut 2 pieces of stainless steel chains to the same length with an angle grinder.
Then screwed to the lid and bed with penny washers.
⚖️ Project Variations
Here are some different ways you can enhance and truly personalise this project:
- Using clips - if you prefer interchangeable covers, you could simple use long polypipe clips instead that are easy to remove
- Drilled pipe holes - if you can't find pipe clips in home improvement stores, you can keep costs dow by drilling pipe holes with a flat wood drill bit
- Garden stakes - for a less permanent solution, push garden stakes or canes into the bed for the pipes to slot over the top and use polytunnel pipe clips
- Wooden weights - instead of screwing the trim to the frame, you could use them as weights, and screw one side down if it keeps flapping in the wind
🦺 Safety Tips
- Use PPE is using a mitre saw or other machinery
- Don't wear gloves while using a screwdriver or drill as they can get caught in any spinning mechanisms (not fun!)
- If treating your frame, wear gloves and do it in a well-ventilated area
🧽 Care and Maintenance
- Check for any tears or rips daily. You may need to use duct tape to prevent any from getting worse.
- Avoid leaving the lids open on a very windy day, or opening them, as they can act as sails.
- Clean every week, stain every year, etc
- If the weather is forecast for storms or high winds, anchor your lids down with cabin hooks, or temporarily screw the lid to the bed with a scrap piece of wood
💡Pro Tips
- Choose the best quality cover you can afford. And if in doubt, I recommend ordering samples before making any costly purchases.
- On warm days, ensure your hoop house is well ventilated, and use frost blankets at night if the weather will be below 5c just in case!
- Monitor the temperatures, particularly on hot or freezing days. You can prop them up with wood or brick for vents, or use fleece to insulate
- Depending on the food you want to grow, you can create low tunnels if you needed, or increase the size of your upright for taller crops
- If the width of your row is extremely wide, you may want to add another support instead of one half way on both sides
- When it's coming up to harvest season, have a think about what you can grow for succession planting. I recommend Charles Dowding's Calendar of Vegetable Sowing dates if you're based in the UK
❓ FAQ
A hoop house extends the growing season when the weather cools so you can protect plants in the Winter months and from pests. It also creates a warmer environment in the Summer for tomato and pepper plants.
Try to grow self-pollinating vegetables in a hoop house, such as brussels sprouts, cabbage, kale, broccoli, and so on. You can also grow fall veggies or warm weather crops, but ventilation is important when daytime temperatures increase.
➕ More Garden Projects
Looking for more easy gardening projects like this? Try these:


Why not subscribe to my newsletter to hear about the latest projects and exclusive news from The Carpenter's Daughter? You can also connect with me on social media at Facebook, TikTok, Twitter, and Instagram!
DIY Hinged Hoop House for Raised Garden Beds

Are you ready for the growing season? Maybe your seeds are germinating, but you don't have protection yet? If not, then don't worry. Here's my simple hinged DIY hoop house instructions.
You won't need to buy plans to match your vegetable garden bed! It includes a YouTube how-to video and alternative ideas.
Materials
- 25mm polypipe
- 25mm pipe clips
- Clear tarpaulin
- Cast iron handle
- Cabin hook
- Staples
- Stainless steel wood screws
- Stainless steel or zinc washers
- 38mm x 63mm CLS structural timber in 2.4m or 1,8m lengths (depending on your raised bed length)
- Wooden slats (usually used for trellis)
Tools
- Plastic pipe cutter
- Heavy duty stapler
- Combi drill
- Drill bit
- Mitre saw or hand saw
Instructions
- Creating the frame: The easiest way to get your cut marks is to position a length of CLS along the shortest side of the bed(right in the corner) and mark with a pencil where the other end of the finishes. Tip: I do this while the slimmer sides of the frame are facing the ground. Cut 2 pieces to this length (one for both ends). Then push them together while in line with the shortest end again and position a longer length again (see pic) and mark where the longest side finishes. Cut this twice. You should now have a box frame. You will also need to cut 2 x 2ft pieces, ortaller if you wish.
- Screwing the frame: Next, drill and screw all of your 4 pieces together. I used long 70mm screws, or use similar. Note: don't skip predrilling as your wood is likely to split. Then mark centre of your shorter sides using a tape measure for your 2ft uprights (or thereabouts) and place them inside the frame. Predrill and screw them together. I used 3-4 screws for this are. Note: you could position them on the top of the frame, but you'd need very long screws.
- Adding a top pipe support: Now you'll need to cut a support piece for the top. To get this measurement, place a long length underneath the frame at the bottom, in line with the uprights. Now mark between it and cut. Note: don't take the internal measurement from the top as it will be out. Then get a friend or a couple of clamps to hold it in place while you predrill and screw it to the top.
- Cutting and attaching the pipes: First, screw a pipe clip in the corner of the inside of the longest sides of the frame. Now push some pipe in one of the clips (we'll cut some down shortly), and arch it over the frame. Now the trick is to cut a piece to a manageable size, but make sure it's a bit longer than you need. Then cut a little bit down and test to see if it fits in both pipe clips without any gaps at the top of the support. Once you're happy, use this as your template and hold it against the coil of pipes to mark and cut again. I cut enough for around every 40cm.
- Screwing the pipes in place: Now evenly position your pipes every 400mm/40cm (or thereabouts) (40cm). Then drill screw holes top centre of each pipe, then screw the pipes down to the top rail (AKA ridge pole). For the end hoops, make sure the pipe overhangs by about 5mm to make sure the sharp edges of the wood don't catch on the plastic later. I also recommend screwing the pipes to the frame just above the clips for extra strength.
- Attach supporting slats: To remove any movement from the pipes, I slot in a long slat (this is a narrow strip of wood) inside the frame. The hold against the top rail and mark and cut. You need 2 of these. Then drill and screw these halfway down the arch and repeat for the opposite end. Tip: I cut a scrap piece of pipe down as a jig to use for reference to drill evenly all the way across.
- Covering the hoop house roof: Now place your clear plastic cover or netting over the top of your arches. Ensure you have enough plastic overhanging on the short sides of the raised bed will you can trim down after stapling. Tip: clamps help to keep it steady if windy, or try to do it indoors or under shelter if raining.
- Stapling the plastic to the trim: Now cut some trim down to the same length as your longest side of the frame. Then position it in line with the longest end of your plastic (which should be a factory cut). Then staple to covering to the wood every 10cm or so. Wrap it underneath a couple of times if the length allows you to.
- Screwing the trim to the frame: Now line up the trim to the frame. Then drill and screw the trim while also using washers. I did
this every 20cm or so. - Tightening the plastic sheet: Now go to the other longest side and staple the plastic to another piece of trim. Then roll the trim while making the sheet tight as you can without ripping the plastic. Then drill and screw the trim to the frame with washers.
- Covering the short side of the raised bed: Now pull the centre of the shorter end of plastic down to make it tight and staple
to the wood. Then carefully pleat fold and staple the excess as tidily as you can and repeat, working your way outwards until you have no excess left. Repeat for the opposite end. Tip: if your excess is touching the floor, this can bunch it up, so you may be best trimming it a little first for even pleats. - Adding trim: Now cut some trim to the same width as your frame (this is your new width with the added trim on the sides). Then drill and screw the trim to cover the pleated plastic. Note: you don't need to use washers for this, for a good look, I recommend it to match the rest. Then slice off the excess plastic with a utility knife or scissors.
- Adding hinges: Next, position, predrill and screw 2 hinges where the lid and the base meet. I roughly positioned them about 8 inches from either end.
- Mounting a handle: Now predrill and screw a handle to the lid for easy opening. I don't recommend adding it in the middle as I do here, as it makes it difficult to reach over to open while chains are attached. Instead, add it to one end, or better still, add one on either side if you can afford it.

Comments
No Comments