
Here's how my Dad walked me through knocking a wall through to create a new doorway. Please note, I am not a professional, so always consult with an expert before attempting anything structural.
In today's blog post, I'm back sharing more major renovations on my parents' latest bungalow project.
I've loved every minute of helping at weekends because I've been learning so much for possible future houses.
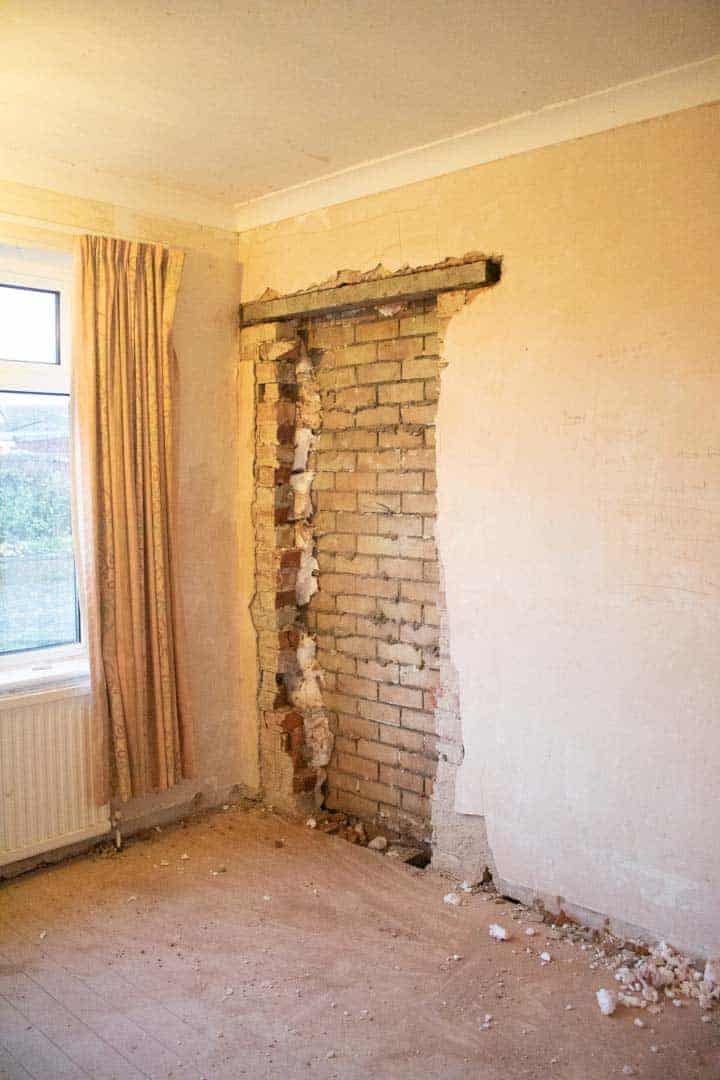
So, above, after knocking a wall through, in a bedroom, you can see a 2nd layer of bricks. These have since been taken out as there's a garage behind here. However, you can apply this to many bungalow internal walls.

The plan is to create an ensuite with walk-in wardrobe leading from the bedroom.
You can also see a lintel above the doorway which has since also happened on the opposite side.
However, if you're knocking a wall through with rooms upstairs, then you'll need to ensure you use acrow props. Typically, you'll remove one brick and prop it up to prevent from dropping. But I was very, very gentle in removing the brickwork to prevent the few rows of bricks collapse from above.

CREATING THE DOOR SIZE HOLE WHEN KNOCKING A WALL THROUGH
At times like these, I'm so glad my Dad knows his numbers. He's a carpenter (my name says what it is on the tin), so he told me to write down the door maths on the wall. If he wasn't here, I'd be researching for hours online and stressing.
So, first, he asked me to hold a large, straight structural C16 timber length against the wall to draw along it. This would be the start of the door frame. Then because he knew a door is 30" x 78", I needed to draw an opening with the
- Width: 33"
- Height 83"
See the calculation below, which you should sit down and work out for yourself too.

So my Dad explained our opening needed to be bigger to take the following into account. Remember, we started with width 30" x height 78". Above, you can see me drawing these measurements with a spirit level as a guide from that original pencil line I made.
(Just ignore all the rough doodles on the wall before knocking a wall through. My husband and I did this the previous week to get an idea of a doorway area as a visual).
For the width, we added:
- 1" each side of the door width for the frame
- 1 for clearance
For the height, we added:
- 1" for frame
- 3" for lintel
- 1" for clearance

REMOVING THE PLASTER FIRST
Before I started knocking out the walls, I chipped away at the plaster to expose the brickwork. Note, I am wearing a mask, goggles and ear defenders.
We used a JCB SDS drill with a flat head chisel attachment to make easy work of it. At the time, I tried opening the window too but assumed it was locked. It's a dusty job, so try to vent the room as much as possible.
I also stood on a step ladder and started towards the top, working my way down.

Once I'd stripped all the plaster, I started removing the plaster for where the lintel needed to go.

I was advised it was best to only pick away at the bricks and avoid a stihl saw. From previous experience, I know it created a film of brick dust everywhere.
So instead, I'm drilling lots of holes first in the lintel area.

I'm drilling holes about 1" apart of each other so they can be removed with ease.
We needed them to come out easily to prevent mess and bricks falling down.
The last thing you want to use yet is a sledgehammer.

Once all my holes were drilled around the lintel area, I used a flat chisel head attachment again.
I'm focusing on the weak areas I'd created with a drill.

Then every time I saw a weakness in a brick, I'd alternate by removing bricks with my hand and a very small club hammer.

ADDING A LINTEL ABOVE A DOORWAY
Then, as quick as a flash, my Dad lifted the lintel and slotted it in on his own. Please note, they are extremely heavy and I personally would need a spare pair of hands to lift one with me.
Although the lintel looks small, it's made of solid concrete and rebar inside to help hold its shape.
You may also need to cut it with an angle grinder.

DRILLING A HOLE THROUGH A DOUBLE WALL
If you are creating a doorway hole in an internal wall, you won't need to do this.
Because of the garage wall on the opposite side, I needed to drill a hole straight through so we could repeat the same work.
This meant we needed to locate where the lintel would also go on the other side.

PROPPING UP THE LINTEL BEFORE KNOCKING A WALL THROUGH
We then needed to prop and wedge the lintel up. And it's important to use shims that don't crush. My Dad initially looked for slate as we have used on previous projects. However, in the end, he found and recycled some old Formica from a roof. Formica is layers and layers of paper, laminated and extremely tough and like shards when broken. It also doesn't crush.
Above, he's propping up the lintel with a crowbar and hammering in the Formica. Then repeated for the opposite side. YOU MUST WEAR GOGGLES FOR THIS.
The lintel's ends are also not resting on bricks where they join with mortar, otherwise, it would be weak.

Then, we drilled holes around the pencil line I created. However, to make life easier, we focused on working along a running bond join for a cleaner cut.

Now the lintel is holding things up, I could start chipping away at the remaining bricks below.
Ensure you don't hammer the bricks that are holding up the lintel of course.
I was also steady. Because. Well... just in case!

Then the sledgehammer came out to be a bit more ruthless.

We also removed a layer of bricks below so we can ensure the floor runs into the next room.

Unfortunately, our JCB SDS drill packed up towards the end, so couldn't get a near finish.

However, because the garage space behind was only partially bricked up and didn't lead to the house, a Stihl saw was used. This gave a cleaner, straighter cut when repeating the same work.
So, when we knocked the bricks from this side, they came out perfectly.
I'll keep you posted with an update soon on our work in this room.
More Home Removations You Might Like
If you need to do an array of home improvements in your house, then here's a few you I've had to do too that you might find useful.


Knocking a Wall Through for a Doorway
Here’s how my Dad walked me through knocking a wall through to create a new doorway. This is for a bungalow only with no brickwork upstairs. Please note, I am not a professional, so always consult with an expert before attempting anything structural.
Tools
- SDS drill
- Chisel attachment
- Drill
- Dust mask
- Goggles
- Ear defenders
- Sledgehammer
- Lintel
- Step ladder
- Hard hat if working higher than your head
Instructions
- Wear safety gear and open all windows to make the house well ventilated.
- Draw where you plan to have your door from the floor up. Refer to the measurements in the notes above. Including the length of the lintel.
- Chip away all the plaster on the bricks.
- Drill holes around the bricks, every 1.5" where the lintel will go.
- Gently hammer or chisel the top bricks. If you're unsure of the wall's stability, you may be best using an acrow prop to prevent bricks from collapsing. You are doing this at your own risk.
- Once removed the top layer of bricks for the lintel, add your lintel.
- Pry the lintel up and pack wedges underneath like slate shims that don't crush, or similar. Keep repeating until the lintel has no movement at all. See note for lintel placement.
- Drill more holes along the side of the projected door opening and remove bricks with a club hammer. Always be careful and remove slowly to stay safe.

Lindsay Blair Rennie
when not changing the structure here in Canada on war time houses or houses over certain year goes under the grand father clause. I heard stories how some houses were put together and stairs , access to crawl space during war time made for soldiers coming home. I can imagine you can tell me stories. Change structure here you should let city know.