
My tips on installing mirrored one way privacy window film. This is a very honest DIY tutorial to prevent any frustration and problems you might face by following YouTube videos.
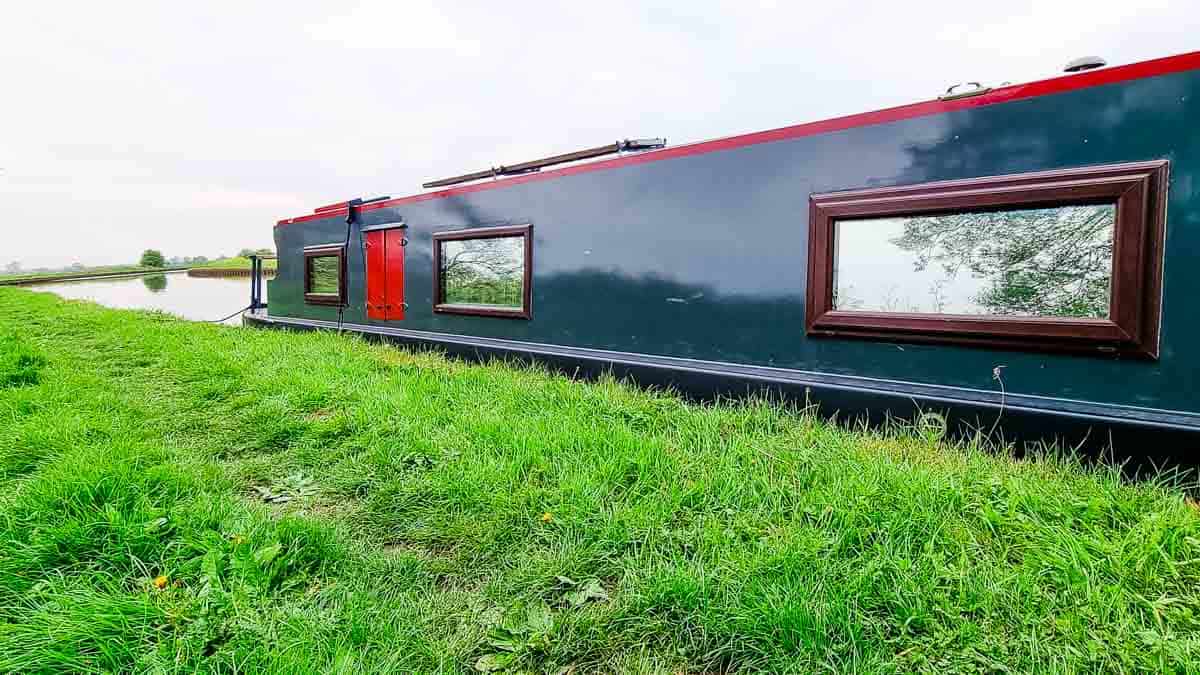
Recently I installed this one way vision glass vinyl film on our UPVC narrowboat windows.
I understand UPVC on a boat is an unusual combination, but one way window film should also work on traditional narrowboat windows if you can't afford tinted glass.
But, if you're in a house, a one way glass window film can also be used as:
- bathroom window privacy
- kitchen window privacy film
- glass door film
- shower window privacy film
- upcycled furniture with glass windows for a mirrored effect
- bedroom window privacy film
Below, you can see how we've used privacy film on windows for our narrowboat so we can see out, not in from the towpath. *Note, the middle window hasn't had it installed by this point.

How One Way Privacy Window Film Works
There's lots of windows film available on the market, depending on the type you want. You can buy:
- patterned window film
- opaque window film, like frosted
- blackout window film
- and one way mirror window film, often in silver or blue*
We chose the last option above, which is also tinted window film. And how it works is, during the day when it's sunny outside, we can see out, but no one can see in.

Can You See Through Privacy Films for Windows At Night?
When it's dark outside, privacy film for windows at night work in reverse. For example, in the photo above, you can see that it changes into a mirror on the inside.
This also means that people can see straight in from outside, so you'll probably want some curtains or additional blinds.
If this is not for you, then I suggest you try and buy a 2 way window film for day and night privacy.

Applying Privacy Window Film
First, let's talk about how there are many different videos on YouTube on how to install privacy window film.
And if you're new here, some friends and family have called me the Queen of DIY from purely watching several videos and then attempting things for myself.
However, I ended up installing window film for privacy my own way, because I didn't like the first result. So I'm going to share how I cut to fit window privacy film a much simpler way.

Mistakes To Avoid When Applying Sticky Window Privacy Film
Above, you can see my first attempt film on windows for privacy and it didn't go as smoothly as many of the YouTubers I saw. So I'm going to list the problems you could face in an attempt to expose what could have been left out.
One Way Window Film Can Slip
The first lesson I learned when cutting privacy windows film is that you need to make sure it's a manageable size. Otherwise, it can be heavy and keep slipping down. Many videos say leave an allowance to trim, which I sort of agree. But because you'll be left with some waste, you may not feel inclined to make two cuts from the get go.
Use a Sharp Craft Knife
I might be stating the obvious here, but yes, you need to cut for frosted glass film, or whatever you choose with a sharp Stanley knife. And you might need to keep replacing it, or it can drag and ripple. Also, don't cut in the direction away from a corner - always cut towards a corner, or it can also drag.
If You Have OCD, You'll Hate Fitting Decor Window Film
And finally, if you have OCD, you will absolutely hate fitting privacy window film. There is a serious amount of bubbles and moisture to remove and you need a lot of patience and perseverance.
If this is not you, I suggest you buy tinted glass, or hire someone to do the job, OR, install with the intention of possibly fitting Venetian blinds too.

Leaving An Allowance To Cut Can Create Issues
The biggest issue I found (and ended up fitting window frosting my way) was leaving an allowance created a few potential problems:
- It can be such a tight fit, leaving the film to overlap and bend around the window beading and not sticking to the window properly. *You can see this in a photo above).
- Cutting with a Stanley knife doesn't give you a perfect straight edge all the time, but running alongside a credit card does help.
- I agree with some videos that exact height is better and leave an allowance either side if you must. If you leave an allowance at the top, the water struggles to escape.
- When pulling off the excess film, you risk tearing it, which is not an attractive look
- Poorly fitted window clings are very noticeable from the outside during the day

My Method on How to Put Up Mirror Window Film
Because I hated the results of my first removable window tint (and I don't like being defeated), I want to show you my quicker method.
And that is to measure the exact visible glass you have inside the window's beading.
But there's two caveats to this method:
- You must triple check your measurements, because you can risk cutting it too small if you measure wrong
- And, the internal beading is never BANG on, so you will get the odd millimeter if windowpane not covered, which I am happy to sacrifice due to the below reasons.
The reason I prefer this is:
- It's quicker
- Less frustrating than fitting WITH an allowance to trim after
- You don't risk making untidy slices with a stanley knife
- Less time trying to remove moisture and bubbles
- It's more likely to stick down on the corners
- You don't need to keep changing Stanley knife blades
Disclaimer: we do also plan to fit Venetian Perfect Fit Blinds on our narrowboat windows for extra privacy, so any edges will be covered.

Prep Before Installing One Way Window Film
Before you even get started, it's imperative that your glass clean. This means:
- No dust particles
- Remove grease marks or fingerprints
- No specs of paint from previous renovation jobs
- Remove silicone along the edges of the glass if smeared on, or any bumps protruding just outside of the beading
To do this, I:
- Used my metal vinyl smoother as a scraper to remove paint marks
- Removed any silicone with some WD40 and paper towel and gently rubbed away
- Cleaned with windowlene
- Used a microfiber cloth to remove any particles

Wet Your Windows
You'll also need to create a slippy environment so you can easily move your one way privacy window tint into the position you need.
So above, I'm spraying with a soapy water solution. This is just warm water mixed with a drop of washing up liquid.
Alternatively, some tutorials recommend baby shampoo.

Peeling The Backing Off One Way Film
Most one way mirror film come with a peelable backing that you need to separate. Although, if you worked in retail like me, you'll know that any window shop window decals are vinyl and only need water and a squeegee. Not so here.
To peel off, you can add some masking tape tabs on both sides of one of the corners. Then try to pull them apart, using them as handles. *But as long as you have clean fingers, I didn't think it was that important.
If dealing with a VERY large window, I would only peel off part, spray with water, then line up to the window. Then peel and spray as you go as I did in my How to Wrap a Kitchen Door With Fablon guide. I think this is less vital when dealing with very small windows.

Position And Start Smoothing Out
Once you've carefully positioned your 1 way window film, you should be able to glide it about until you're happy.
You then need to spray with more soapy water, then use a firm, but not sharp, squeegee to run the moisture out.
Also, keep some paper towels at hand to blot the excess water.

Remove Bubbles With a Smaller Squeegee
The final job, which is where you'll lose the most time, is smoothing out all the little bubbles. For this, you'll need to use a small, firmer squeegee. If you don't have one, then use a credit card.
You can wrap some paper towels around it to avoid damaging the privacy window tilt film.
Check Your One Way Frosted Glass In DIfferent Lighting
While you attempt to smooth out all of the bubbles, it can be difficult to see them all. And they're also harder to remove the morning after.
So, I recommend turning your house lights on and off and inspect from all angles. Even wear a head torch if needed.
And good luck!
Installing One Way Privacy Window Film

My tips on installing mirrored one way privacy window film This is a very honest DIY tutorial to prevent any frustration and problems you might face by following YouTube videos.
Materials
- Window cleaner
- Paper towels
- Washing up liquid
Tools
- Large squeegee or vinyl smoother
- Small squeegee
- Spray bottle
- Stanley knife for tricky areas
Instructions
- Clean the windows thoroughly and ensure dust and paint free
- Measure and cut the privacy window film to the exact window size
- Spray the window with washing up liquid solution
- Peel the backing off the window film and place in the window
- Slide into position
- Spray the film again
- Smooth with a large squeegee, running out the water
- Use a smaller squeegee for smaller bubbles
- Inspect until all bubbles are removed and leave.

Comments
No Comments