
Here's how to build my small backyard DIY chicken pen as seen on ITV's Love Your Weekend with Alan Titchmarsh. It's ideal for one or two smaller Bantams and attached to a chicken coop with a top door, allowing you to climb in.
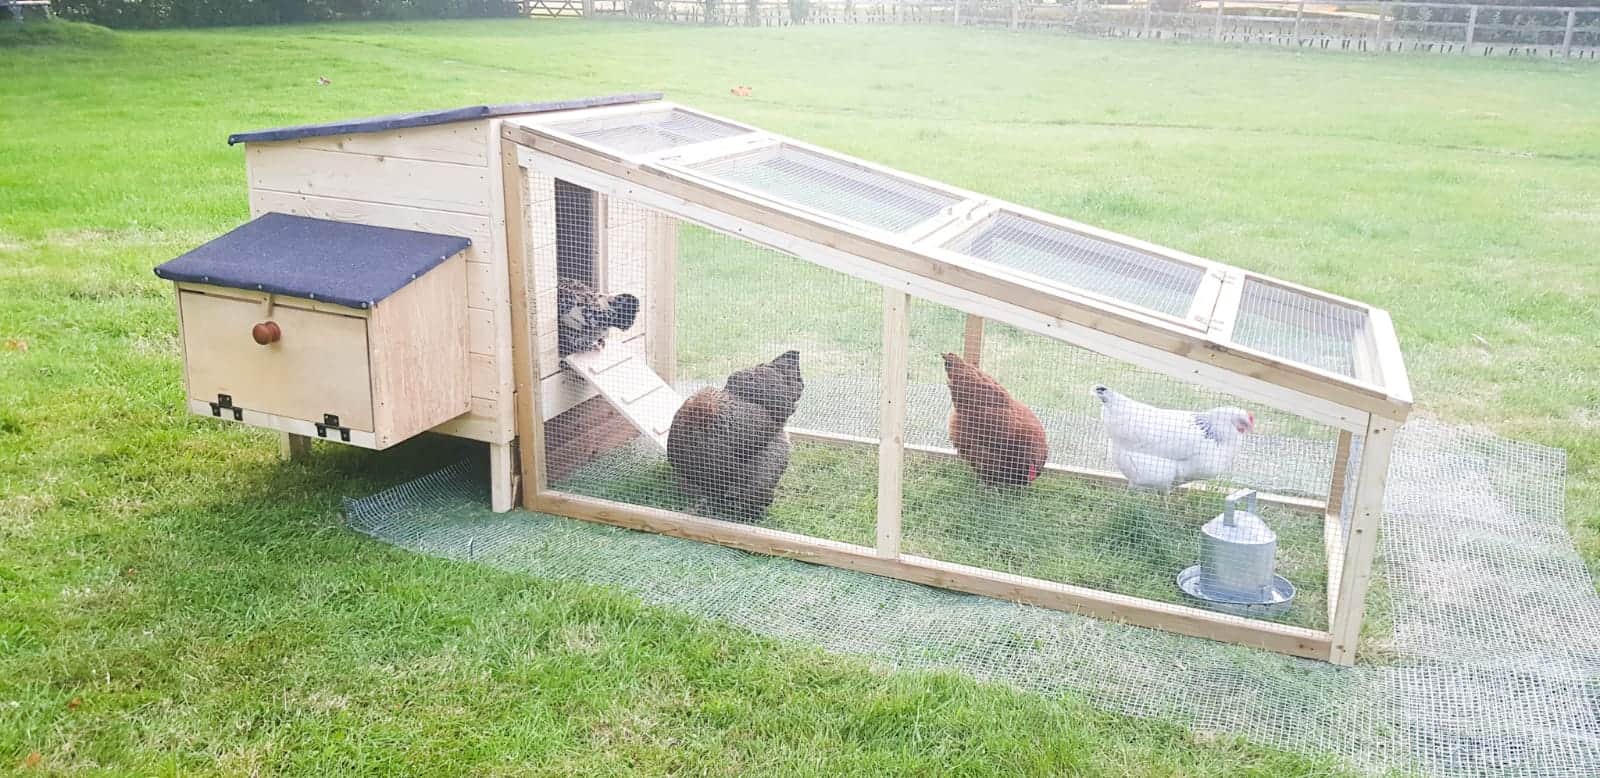
I found many chicken pen designs online. But I wanted to create what I considered to be the best DIY chicken coop run plans for the show. And as the TV carpenter, I had some set criteria to stick to. It needed to create a:
- "How to build a simple chicken coop and pen" design that's really easy for anyone at home to build one themselves
- Big enough for a couple of chickens in the day
- Small enough to build, then fit all the materials in my van
- Be something I could screw together in an hour
- Keep out any foxes
- Be able to attach to the rain proof DIY chicken coop with nesting box, which I shared recently
- And as always, be practical to get in and out for easy DIY chicken coop cleaning, hence why this is a a sloping lean-to chicken pens DIY project
I'm very happy with how it turned out. and so I'm going to show you how to make a chicken pen exactly like this.
Jump to:

🛖Previous Chicken Coop Build
Before you start building a chicken run, if you haven't seen my how to build a chicken coop step by-step with pictures tutorial, I recommend you read it first. It also includes chicken coop plans in an image, so there's no need to sign up for a PDF.
If you're planning on building a large chicken coop plan, or have a large chicken or two, then you'll probably need a large chicken pen. A walk-in chicken pen may be a better option for you. Or, while raising chickens, this could be ideals for chicks, or even as a night time pen to ensure they're safe from foxes.
This lean-to-chicken pen style is really ideal for smaller hens, such as a bantam or two. It's got about 2 square foot of chicken run DIY space. Also, due to its DIY small chicken pen size, it could also be perfect treated as portable chicken pen plans. That way, you can move your DIY chicken coop and pen out of the sun, etc. Or, again, to make it safer from predators.

📎Free Chicken Coop Pen Plans
As everyone's needs are different, I recommend that you treat the measurements in my free DIY hen house pen plan as a guide.
This is a sloping roof DIY chook pen with a top opening hinged door. The idea is, that it's at the right height to open and step in so you can easily clean the hen coop itself.
Other Uses than a Chicken Run Pen
There are certainly more occasions you may need a DIY pet pen. We originally bought a metal chicken pen years ago for our dog. So, here's just a few ways you can use this DIY chicken hutch:
- A great solution to stop chickens pecking another chicken
- DIY dog pen indoor to keep an eye on them
- Use it as a DIY puppy pen to make sure they're safe in their early stages
- DIY rabbit pen or even a DIY indoor rabbit pen
- Or, even make a DIY chicken wire fence without the need of a roof or lid

🪛Tools for Making a DIY Chook Pen
Please note, I am an Amazon Associate. Therefore, if you buy anything from my homemade chicken pen's materials list, I earn from qualifying purchases made through these links.
- Hand saw
- Tape measure
- Pencil
- Chicken wire *preferably galvanised mesh so it doesn't stretch for a partial DIY metal pen
- Tin snips
- Staple gun
- Clamps
- Combi drill
- Drill bit
- Wood screws
- Nail gun
- Safety goggles
- Ear defenders
- Hinges
- Handles

📋Instructions
To build the frame for a chicken coop DIY pen for episode 1 of Love Your Weekend with Alan Titchmarsh, I laid 3 uprights evenly above a straight piece.
All three uprights are currently the same height. But, because my DIY chicken house's pen would slope, I held another long edge from one top corner.
Then angled down towards the opposite side where it was about 60cm from the bottom. I then drew where the sloping piece fell, giving my cut marks, which I'll do shortly.

Two Ways of Building a Chicken Coop Pen
There are two ways as to how to build a pen for chickens here. Above, I'm now pre-drilling and screwing the chook pen framework together. However, if you want to make a more easy chicken coop pen, then you could use a pocket hole jig.
A pocket hole jig isn't traditional carpentry and my Dad thinks it takes longer. But, if you're a beginner at woodworking, I personally think it takes a lot of fumbling out joining wood together.
Don't get me wrong, you're still better off with clamps. But, what you can do instead, is nail the timber to a workbench so it doesn't move while screwing.

Creating a Sloping Chicken Pen Roof
Then, after screwing the long bottom edge to all three uprights, I cut all three to create my slope.
If you don't have a hand saw, I suggest you buying one for the job. It's a very basic tool. But, of course, you could use a jigsaw instead.

Then, I added a longer length of timber along the top, which now snuggly fit to my new mitred cuts.
You'll noticed I screwed it together before cutting with a handsaw again. Yes, you could use the exact length instead. However, this method prevents me from pre-drilling and screwing.
And, I can cut it at the right angle by running the saw along the edge of the upright of timber.
Tips for Following My DIY Chicken Run Plans
While building your house for chickens, it's best to make it square so your doors will open and close ok later.
Due to it having a slope, I made it square using a speed square and nailed to the worktop. But, I also nailed offcuts around it to the worktop to prevent any movement.

After the first side of my chicken coop's DIY pen was built, I then needed to mirror it again.
Above, I'm sharing my easy chicken pen method. And that is, simply build on top.
I screwed another batten directly ontop to match. And repeated with the bottom piece, too. Then, you know where to cut everything down.

To match the battens inside, above, I held a longer piece just inside from the bottom. This is positioned exactly where the first side's middle batten is.
Meanwhile, I held a straight edge along the top, next to the middle batten again.
Then, I could drawer from underneath to mark where to cut it and repeat for the outer inner battens, too.

Finishing the Last Side for My Chicken Run Build
After all of the cuts were done, I again, screwed it all together and below, started working on the lower end.
Now, depending on the size of your chicken house plans, our chicken coop was about 75cm wide. So, I had to ensure my rectangular chicken run wasn't wider than this in total.
Of course, you could create a wide chicken run, but you'd need to add an additional panel closer to the coop. But, if you're chicken coop and run that has more nesting boxes than mine, it may be a pointless exercise.

Again, I'm copying the height of the end side panel by nailing a batten above. But, I did make the horizontal batten wider.
Then, screwed it together to create a square panel.
Note, by copying the panels below, I knew they were square. So I didn't have to keep checking it all the time with a tape measure from either corner.

🐔How to Build a Chicken House and Run with Metal Mesh
Well, the first question I asked myself on this was, what chicken pen wire should I use? And I was immediately told by my Dad that isn't best for a chicken wire pen. That's because it stretches and warps.
Instead, I'm using a galvanised mesh, typically found on rabbit hutches, etc. It won't rust in all weathers and it prevents foxes from pulling it. A cheaper alternative would be chicken pen netting, but it's much more fragile and not fox proof.
I recommend handling it with good gloves as it's very sharp. And then, I'd line it up along one side and staple it down.
Important Tip
When making your mobile chicken pen, make sure your flip over one of the side panels before adding DIY chicken wire. This is because as I'll be adding trim shortly and the trim should be facing outwards.
In other words, we don't want to

How to Cut Mesh Wire
The quickest way to cut mesh wire, is with an angle grinder. But obviously the sparks can be intimidating and you'll need to wear goggles, long sleeves and ear defenders.
Also, it leaves marks in the wood, but I'll be hiding this with trim and any mesh raw edges shortly
However, my favourite method where possible is using tin snips. It's a safer and more relaxing experience if you're not in a rush. You could also use a hack saw, but I can imagine it being quite frustrating.

Adding Trim to the Homemade Chicken House Pen
Adding trim isn't essential when making your own chicken coop pen. But it's a nice added detail as it also hides the raw edges of the mesh wire.
Simply cut to size and nail with a nail gun or hammer and nails.
To add a bit more strength, I overlapped the joins of the framework to create joins in a different place.

Planning a Walk-in Chicken Pen Via the Roof
Now our DIY walk in chicken run has 3 sides, I was able to place it in front of our wooden chicken coop house. Although, note, I later did make an additional 4th back panel for a stone alone outdoor chicken pen. There may be times you want it to be more versatile, for such as a baby chicken pen.
This allowed me to plan the lid doors with hinges to open easily for cleaning. Essentially, this is a step in chicken pen, which I hadn't seen before.
But, note, it was also vital this was sloping, so it would be an appropriate height. If it was too tall, I wouldn't have been get to step in.
For the roof, I first created a rectangle box shape and screwed it together.

You can see above, I had two mesh sections at either side that didn't open.
Then, in the middle, created a pair of doors. This is simply two squares, making sure there's a 5mm clearance for hinges and opening all the way around.
Below, I next screwed on the two handles on the doors, including 4 hinges: 2 on each side.

Screwing Together
Now that all sides of our easy-build chicken coop pen were made, I then drove it to the Love Your Weekend TV set in Hampshire at Manor Farm.
To screw the small chicken run together, I propped it up on a flat surface while clamping and predrilled first.

I then placed the roof on top and also predrilled and screwed together.
Note: in the picture below, you can see I did also add a 4th side at the back. This was only temporarily screwed on for the first half of the show to keep chickens in.
It would later be taken off where the chicken pen would be attached to the chicken coop.

Chicken Runs DIY Door Hatch Stopper
If you can see above, the doors are sagging ever so slightly. And that's because I originally screwed on some door stops slightly too low.
These are simply offcut blocks to help the doors stay in place.
Below, I corrected them while put together and screwed them higher up.

🦊Fox Proofing Your Chicken Pen
To protect the chickens from foxes, I cut a long strip of wire mesh in half, lengthways with tin snips.
I then trapped underneath the coop to discourage foxes from digging underneath.
You could cover this with dirt to encourage grass growing through it. However, chicken expert, Suzie Baldwin, says that tent pegs are suitable enough.

Below, you can see the how to make a chicken run project segment on Love Your Weekend with Alan Titchmarsh, episode 1. This is before we attached it to a small chicken coop DIY, which you can see at the top image in this page.
Also, if you're looking for a different design, I originally pinned lots of chicken pen ideas here if they help.
In the same episode, I showed you how to make a chicken coop. I just love how this simple chicken pen and coop looks! Now you know how to build a chicken run!

💲Chicken Pen Cost
As I built everything at my Dad's woodyard, I can't say how much it cost. However, I suspect it would cost around £150 for the materials to build.
If you're looking for more frugal chicken coop ideas, then you could check out eBay for a chicken pen for sale. Or, try and source free woods, to say, make a DIY pallet chicken coop pen. Pallet wood is perfect for a building a chicken pen that's small, but you must make sure it's not had toxic substances on it.
However, for large chicken pen plans, you'd be best creating one like a picket fence with lots of uprights and short horizontal joining pieces. Or lots of separate chicken wire frame DIY square panels that can be joined with hinges or other diy chicken coop accessories.
There are also different parts of a chicken coop to work around, such as designing around nest boxes. So, bare that in mind while designing.
➕More Projects You Might Like
Here's some past projects, similar to my DIY Backyard Chicken Coop:
- DIY chicken house (plans free for you to copy and use)
- Easy dog house made out of plywood
- Reclaimed wood DIY coat hook with dog lead holder
- How to make a garden chest box for wellies or amazon deliveries
- Easy DIY trellis planter for the garden
- Recycling an old drawer and turning it into an insect hotel
- Rustic Bookcase DIY
- 2 to 3 bike storage shed
👷♀️How to Build a Chicken Pen
DIY Chicken Pen

Here’s how to build my small backyard DIY chicken pen as seen on ITV’s Love Your Weekend with Alan Titchmarsh. It’s ideal for one or two smaller Bantams and attached to a chicken coop with a top door, allowing you to climb in.
Materials
- Timber
- Chicken wire *preferably galvanised mesh so it doesn’t stretch
- Wood screws
- Hinges
Tools
- Hand saw
- Tape measure
- Pencil
- Nail gun
- Safety goggles
- Ear defenders
- Handles
- Tin snips
- Staple gun
- Clamps
- Combi drill
- Drill bit
Instructions
- Cut all wood to size as shown in my free plans
- Screw everything together
- Staple and cut mesh
- Build the hinge doors, leaving a 5mm clearance all the way around and screw the hinges and handles on.
- Attach to chicken coop

Comments
No Comments